Are you looking to give your laminate flooring a polished, professional finish? Quarter round molding might be the simple solution you need.
It hides gaps, covers uneven edges, and adds a smooth transition between your floor and walls. But choosing and installing the right quarter round can feel tricky if you’re not sure where to start. Keep reading, and you’ll discover easy tips to pick the perfect quarter round for your space and make your flooring look flawless.
You’re just a few steps away from transforming your room’s appearance!

Credit: www.lowes.com
Choosing The Right Quarter Round
Choosing the right quarter round for laminate flooring improves the room’s look and finish. It covers gaps between the floor and baseboards. It also protects walls from damage. Picking the right one is simple with the right information.
Materials And Styles
Quarter rounds come in various materials. Wood is common and matches many floors. MDF is cost-effective and easy to paint. Vinyl is moisture-resistant, ideal for kitchens and bathrooms. Styles include smooth, rounded, or more detailed designs. Choose a style that fits your room’s look.
Matching With Laminate
Match the quarter round color with the laminate floor. This creates a smooth, unified look. Choose a close color or a slightly darker shade. Avoid colors that clash with your flooring. Texture also matters. Some quarter rounds mimic wood grain for a natural feel.
Sizing And Dimensions
Quarter rounds come in different sizes. Measure the gap between floor and wall to pick the right size. Standard sizes work for most homes. Thicker quarter rounds cover larger gaps. Lengths vary; buy enough to cover all edges. Proper size ensures a neat, professional finish.
Tools And Preparation
Preparing for installing quarter round on laminate flooring needs careful planning and the right tools. Proper preparation ensures the quarter round fits well and looks neat. It also helps avoid damage to the flooring or walls.
Essential Tools Needed
Gather tools before starting the project. You need a measuring tape to check lengths. A miter saw or a hand saw cuts the quarter round precisely. A hammer or nail gun helps attach the molding. Use finishing nails or brads for a secure hold. A pencil marks cutting spots clearly. Sandpaper smooths rough edges for a clean finish. A pry bar may help remove old molding if needed.
Measuring And Cutting Tips
Measure the room corners carefully. Measure twice to avoid mistakes. Mark the quarter round pieces with a pencil. Cut at a 45-degree angle for inside and outside corners. Use a miter box if you do not have a miter saw. Cut slowly to keep edges smooth. Sand cut edges to prevent splinters. Proper cutting makes the molding fit tight and look professional.
Surface Preparation
Clean the floor edges and walls before installing. Remove dust, dirt, and old adhesive. Make sure the wall base is dry and smooth. Fill any large gaps or holes with putty. Let the putty dry completely. Check the floor for any uneven spots. A smooth surface helps the quarter round sit flat and stick well.
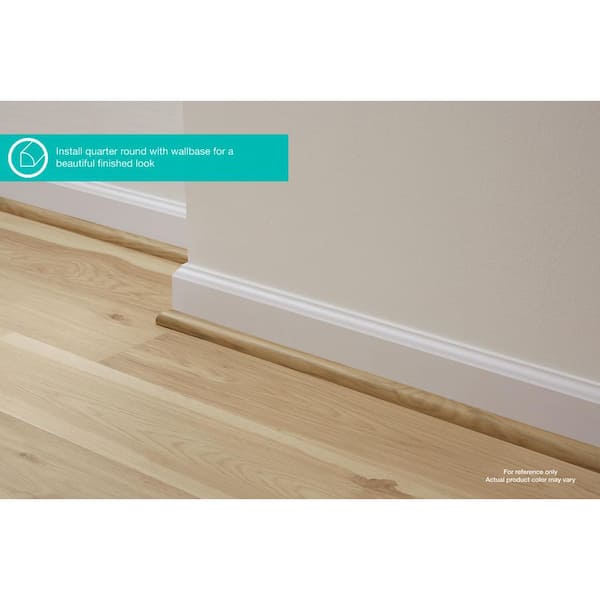
Installing Quarter Round
Installing quarter round molding is a key step in finishing laminate flooring. It covers the expansion gap and gives a neat look. This small trim piece fits against the wall and the floor, hiding any uneven edges. Proper installation makes the floor look complete and professional.
The process is simple but requires some care. You need to place the quarter round correctly, choose the right method to fix it, and handle corners smoothly. Each part affects the final appearance and durability.
Placement Techniques
Start by measuring the length of the walls to cut the quarter round. Place it snugly against the baseboard and floor. Make sure it covers the expansion gap fully. Hold the trim in place before securing it. Check for any gaps between the molding and the wall. Adjust as needed for a tight fit.
Nailing Vs. Gluing
Choose nailing for strong, long-lasting hold. Use small finish nails to avoid splitting the molding. Nail into the baseboard, not the floor, to allow floor movement. Gluing is easier but less durable. Use construction adhesive designed for wood and laminate. Apply glue evenly and press the molding firmly. Wait for the glue to dry before walking on the floor.
Handling Corners And Transitions
Cut quarter round pieces at 45-degree angles for inside corners. This creates a clean, tight joint. For outside corners, use coping or miter cuts to fit the molding around edges. At doorways or room transitions, measure carefully. Cut pieces to meet perfectly without gaps. Sand rough edges for a smooth finish. Take time with corners to ensure a polished look.

Credit: sensorhaus.com
Finishing Touches
Finishing touches give your laminate flooring a neat and polished look. Quarter round molding plays a key role in this stage. It covers gaps between the floor and walls. It also hides uneven edges. Proper finishing makes your floor look complete and professional.
Filling Gaps And Nail Holes
Small gaps and nail holes can appear after installing quarter round. Fill these with wood filler or putty. Choose a color that matches your trim or floor. Use a putty knife for smooth application. Let it dry fully before the next step. This hides imperfections and strengthens the trim.
Sanding And Painting
Sand the filled areas gently with fine sandpaper. This creates a smooth surface for painting. Use light, even strokes to avoid damage. Pick paint or stain that matches your quarter round. Apply thin coats for a clean finish. Allow each coat to dry before adding another. This enhances the appearance and protects the wood.
Maintaining The Trim
Quarter round can get dirty or scuffed over time. Clean it regularly with a soft cloth and mild cleaner. Avoid harsh chemicals that can damage paint or wood. Check for loose nails or gaps and fix them quickly. Well-maintained trim keeps your floor looking fresh and new for years.
Common Mistakes To Avoid
Quarter round trim gives laminate flooring a clean, finished look. Many people make simple mistakes that cause problems later. Avoiding these common errors saves time and money. Learn what to watch out for when installing quarter round.
Improper Measurements
Measuring wrong leads to gaps or tight fits. Always measure twice before cutting. Cut pieces carefully to match corners and walls. Small mistakes affect the final look and fit.
Using Wrong Materials
Not all quarter round trims suit laminate floors. Use materials that handle moisture and temperature changes well. Wood or vinyl trims designed for laminate are best. Avoid cheap or incompatible trims that can warp or crack.
Neglecting Expansion Gaps
Laminate floors need space to expand and contract. Skipping expansion gaps causes buckling or lifting. Leave a small gap between the floor and quarter round. This gap hides movement and protects your floor.
Credit: www.homedepot.com
Frequently Asked Questions
What Is Quarter Round For Laminate Flooring?
Quarter round is a small molding used to cover gaps between flooring and walls. It gives a neat finish and hides expansion gaps. It also helps protect the floor edges from damage.
How Do You Install Quarter Round On Laminate Floors?
Install quarter round by nailing or gluing it to the baseboard, not the floor. Measure and cut pieces to fit corners and edges. Press firmly and secure to keep it stable.
Can Quarter Round Fix Uneven Gaps In Laminate Flooring?
Yes, quarter round can cover uneven or large gaps between floor and wall. It hides imperfections and makes the floor look smooth. But it won’t fix floor level issues beneath.
What Materials Are Quarter Round Moldings Made From?
Quarter round moldings come in wood, MDF, PVC, or flexible vinyl. Wood offers a natural look but can swell with moisture. PVC and vinyl are water-resistant and good for damp areas.
Final Words
Quarter round for laminate flooring adds a neat, clean finish. It hides gaps and protects edges from damage. This small detail can make a big difference in your room’s look. Choose the right color and size for the best fit.
Installation is simple and quick for most DIYers. A well-installed quarter round helps your floor last longer. Keep your flooring project smooth and polished with this easy step. Small touches like this create a complete, professional appearance.