Are you ready to transform your space with laminate flooring but unsure how to start? The layout you choose can make all the difference in how your floor looks and feels.
Whether you want a cozy, spacious, or modern vibe, your laminate flooring layout is the key. You’ll discover simple yet powerful tips to plan the perfect layout that suits your style and space. Keep reading to unlock the secrets that will help you create a floor design you’ll love every day.
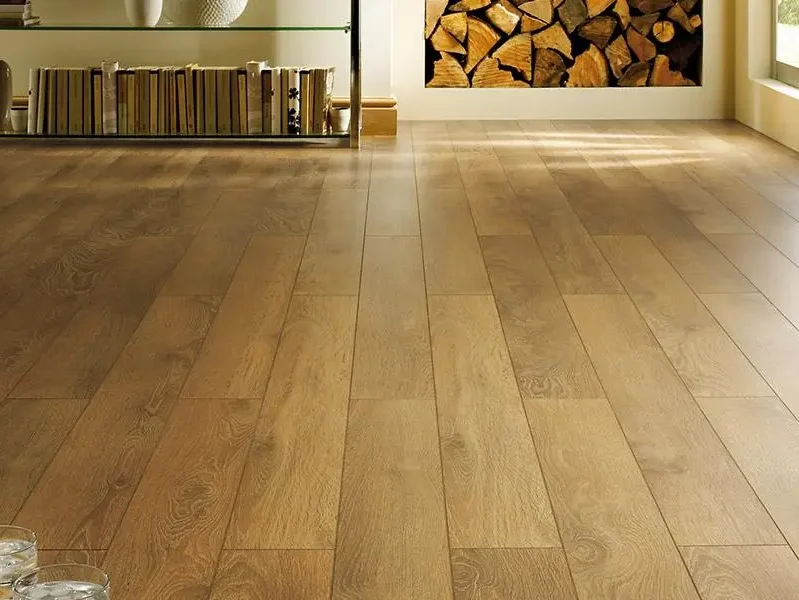
Credit: elephantfloors.net
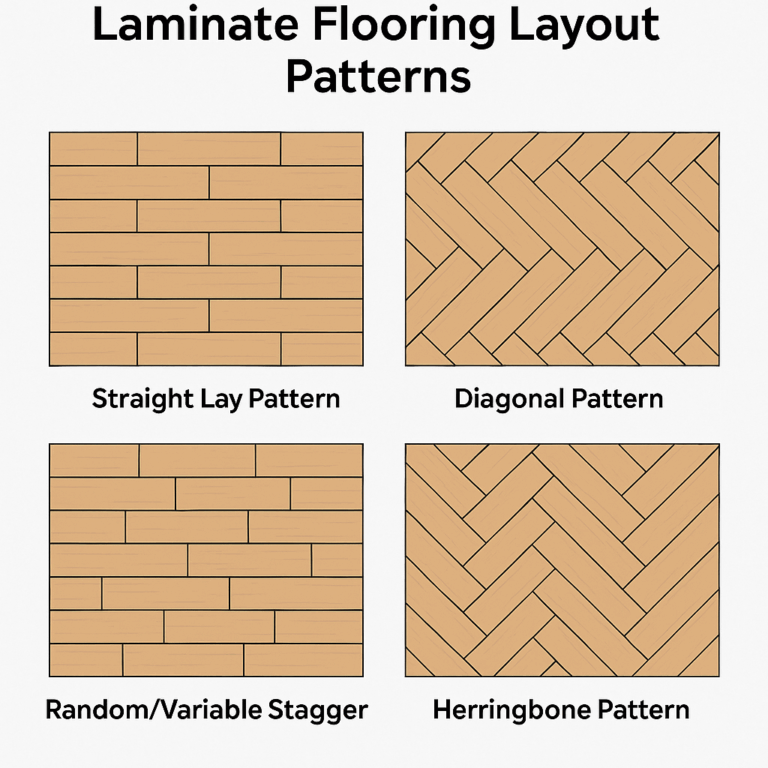
Choosing The Right Pattern
Choosing the right laminate flooring pattern sets the tone for any room. The pattern affects the space’s look and feel. It can make rooms appear larger, cozier, or more modern. Picking a pattern depends on the room size, style, and your taste.
Straight Lay
Straight lay is the simplest and most common pattern. Planks run parallel to the walls. This pattern suits small or narrow rooms well. It creates a clean, orderly look. Straight lay works with almost all decor styles. Installation is fast and easy, saving time and money.
Diagonal Layout
Diagonal layout places planks at a 45-degree angle to the walls. This adds a dynamic and unique touch. It makes small rooms feel larger by drawing the eye outward. This pattern requires extra cutting and planning. The result is striking and adds interest to plain spaces.
Herringbone And Chevron
Herringbone and chevron are classic, elegant patterns. Both involve placing planks in a V shape, but with slight differences. Herringbone uses rectangular planks, creating a broken zigzag. Chevron planks are cut at an angle for a continuous zigzag. These patterns add a sense of luxury and craftsmanship.
Random Plank
Random plank layout uses planks of different lengths and colors. This creates a natural, rustic look. It hides scratches and dirt well. The random pattern suits casual or farmhouse styles. It gives rooms a warm, lived-in feel that many people enjoy.
Planning The Room Layout
Planning the room layout for laminate flooring is an important step. It helps to create a smooth and attractive floor. Careful planning avoids mistakes and saves time. It also ensures the best use of materials. This section covers key points to prepare your room for laminate flooring installation.
Measuring And Marking
Start by measuring the length and width of the room. Use a tape measure to get exact numbers. Write down these measurements for reference. Mark the center of the room with a pencil. This will guide your first row of laminate planks. Accurate marking helps keep the floor straight and balanced.
Considering Doorways And Transitions
Check all doorways where the laminate will meet other floors. Plan how the flooring will flow through these areas. Use transition strips to join different floor types smoothly. Think about the height difference between rooms. Proper transitions prevent tripping and create a neat look.
Aligning With Room Shape
Look at the shape of your room before laying planks. Align the flooring along the longest wall for a natural flow. For odd shapes, plan cuts carefully to avoid waste. Laying planks parallel to windows can enhance light reflection. Thoughtful alignment makes the room feel larger and more open.
Subfloor Preparation
Preparing the subfloor is a key step before installing laminate flooring. A good base ensures the floor stays strong and looks great for years. Proper subfloor preparation avoids problems like uneven floors or moisture damage. Follow these simple steps to get the best results.
Cleaning And Leveling
Start by cleaning the subfloor thoroughly. Remove all dust, dirt, and debris. A clean surface helps the laminate planks stick well. Check the floor for bumps or low spots. Use a leveling compound to fix uneven areas. A flat floor prevents gaps and creaks later on.
Moisture Barrier Installation
Moisture can damage laminate flooring quickly. Install a moisture barrier to protect the floor. Use plastic sheeting or a special underlayment designed to block water. Cover the entire subfloor, overlapping edges. This step stops moisture from seeping up and warping the laminate.
Addressing Imperfections
Look for cracks, holes, or loose boards. Repair these imperfections before laying the laminate. Fill small gaps with wood filler and sand smooth. Secure loose boards with nails or screws. A strong, smooth subfloor helps the laminate last longer without issues.
Credit: floorfathers.net
Starting Point Selection
Choosing the right starting point for laminate flooring is key. It shapes the entire room’s look. A good start helps avoid cuts and gaps. It makes the floor look neat and balanced.
Think about the room shape and how light enters. Also, consider doors and furniture placement. These details guide where to begin laying the planks.
Longest Wall First
Start along the longest wall for a smooth flow. It creates a straight line that guides the rest. This method shows the floor’s length clearly. It also helps hide small cuts at the edges.
Center Or Corner Start
Starting in the room’s center creates a balanced look. It works well in square or open spaces. Corners suit narrow or irregular rooms better. This choice affects how the planks align with walls.
Avoiding Narrow Planks At Edges
Plan to avoid very thin planks at edges. Thin pieces can break easily and look odd. Adjust the starting point to keep plank width even. This step improves durability and visual appeal.
Staggering Plank Joints
Staggering plank joints is a key step in laying laminate flooring. It means arranging the ends of planks so they do not line up in a straight row. This technique creates a strong, stable floor and a natural look. Proper staggering also helps hide seams and prevents weak spots.
Recommended Offset Distances
The offset distance is how far apart plank ends should be from one row to the next. A good rule is to shift joints at least 6 to 12 inches. This distance avoids long straight lines of joints. It helps keep the floor firm and reduces movement over time.
Patterns For Joint Staggering
Common patterns include random staggering and consistent offsets. Random staggering mixes plank lengths for a natural look. Consistent offsets use equal distances, like half or one-third of a plank length. Both methods work well. Choose one based on your room size and style.
Benefits For Stability And Appearance
Staggered joints make floors stronger by spreading weight evenly. This reduces plank shifting and creaking sounds. Visually, staggered joints break up the floor’s surface. They create a seamless, attractive appearance that mimics real wood. This simple step improves your floor’s life and beauty.
Cutting And Fitting Planks
Cutting and fitting laminate flooring planks is a key step in the installation process. It ensures the floor fits perfectly in your room. Accurate cuts help avoid gaps and create a neat finish. Careful fitting makes the floor look natural and smooth.
Tools For Accurate Cuts
Use a tape measure to mark plank lengths precisely. A pencil works well for drawing cut lines. A saw, like a jigsaw or miter saw, makes clean cuts. A utility knife can score thinner laminate pieces. Sandpaper smooths rough edges after cutting. Sharp tools give better results and reduce mistakes.
Dealing With Obstacles
Measure around door frames, vents, and pipes carefully. Cut planks to fit tight spaces without forcing them. Use a coping saw for tricky shapes and curves. Leave small gaps near walls for expansion. Careful trimming prevents damage and ensures a snug fit.
Ensuring Tight Seams
Place planks close together to avoid visible gaps. Tap them gently with a tapping block and hammer. Make sure edges align perfectly for a seamless look. Check seams from different angles to spot gaps. Tight seams keep dirt out and make floors last longer.
Expansion Gap Guidelines
Expansion gaps are essential in laminate flooring installation. They allow the floor to expand and contract with changes in temperature and humidity. Without these gaps, the floor may buckle or warp over time. Understanding how to leave the right space around your floor edges ensures a long-lasting and stable surface.
Why Expansion Gaps Matter
Laminate flooring reacts to moisture and heat by changing size. This natural movement needs room to happen. Expansion gaps prevent the floorboards from pressing against walls or furniture. Without gaps, the pressure can cause cracks or buckling. These gaps keep your floor flat and strong over the years.
Recommended Gap Sizes
The ideal gap size depends on the room size and flooring type. Usually, a 1/4 inch to 1/2 inch gap around the edges works well. Larger rooms may need slightly bigger gaps. This small space gives enough room for the flooring to move freely. Measure carefully to keep the gaps even and consistent.
Covering Gaps With Moldings
Expansion gaps should not be visible. Moldings cover these spaces and give a neat finish. Baseboards and quarter-round trim work well to hide gaps. These moldings attach to the wall, not the floor. This setup allows the floor to move without affecting the molding. Moldings add style and protect the floor edges at the same time.

Credit: www.discountflooringdepot.co.uk
Finishing Touches
Finishing touches give laminate flooring a neat, complete look. These final steps protect your floor and improve its beauty. Proper finishing also helps your floor last longer and stay strong.
Installing Baseboards And Transitions
Baseboards cover the gap between the floor and wall. They hide edges and create a clean line around the room. Transitions join laminate to other floor types, like tile or carpet. Use the right size and style for a smooth flow. Nail or glue baseboards carefully to avoid damage. Check that transitions fit tightly for safety and style.
Cleaning After Installation
Remove dust and debris after laying the floor. Use a soft broom or vacuum with a hard floor setting. Avoid wet mops at first; laminate can swell from water. Clean spills quickly to prevent stains or damage. A damp cloth works well for sticky spots. Keep the floor dry and clean for a fresh look.
Maintaining Laminate Floors
Protect floors with felt pads under furniture legs. Avoid dragging heavy items to stop scratches. Sweep or vacuum regularly to remove dirt and grit. Use laminate-friendly cleaners for deeper cleaning. Avoid wax, polish, or harsh chemicals. Maintain consistent humidity to prevent warping or gaps. Care keeps laminate floors looking new and strong.
Frequently Asked Questions
What Is The Best Layout For Laminate Flooring?
The best layout depends on your room’s shape and size. Staggered boards with offset seams create a strong, natural look. This layout also helps hide joints and adds stability.
How Do I Plan Laminate Flooring Layout Before Installation?
Start by measuring your room’s length and width. Draw a simple floor plan to decide board direction and pattern. Planning reduces waste and ensures a neat finish.
Can Laminate Flooring Be Laid Diagonally?
Yes, diagonal layouts add visual interest and make small rooms appear larger. This method requires more cutting and careful measurement. It’s perfect for adding style but takes extra time.
How Much Space To Leave For Expansion In Laminate Flooring?
Leave about 1/4 inch gap around room edges for expansion. This space prevents boards from buckling when they swell. Use spacers during installation to keep the gap even.
Final Words
Choosing the right laminate flooring layout makes a big difference. It helps your room look neat and stylish. Simple patterns suit small spaces best. Diagonal or herringbone layouts add more interest to larger rooms. Always plan before you start to avoid mistakes.
Take your time to measure and align planks carefully. With the right layout, your floor will last longer and look great. Enjoy the process and the new look it brings to your home.