Are you ready to transform your space with beautiful, durable flooring without breaking the bank? Learning how to lay LVP flooring yourself is easier than you might think.
Imagine the satisfaction of stepping onto a brand-new floor that you installed with your own hands. This guide will walk you through every step, making the process clear and manageable. By the end, you’ll have the confidence and knowledge to create a stunning floor that lasts for years.
Keep reading, and let’s get started on your flooring makeover!
Credit: ouraestheticabode.com
Choosing The Right Lvp
Choosing the right luxury vinyl plank (LVP) flooring is the first step to a successful installation. This choice affects the look, feel, and durability of your floor. Understanding the types of LVP, color and style options, and how to measure your space helps you pick the best product for your home.
Types Of Lvp
LVP comes in several types based on thickness and wear layers. Thicker planks offer more comfort and last longer. Some have a waterproof core, perfect for kitchens or bathrooms. Others focus on realistic wood or stone looks. Choose a type that matches your room’s needs and foot traffic.
Selecting Color And Style
Color sets the mood of your room. Light colors make spaces feel bigger and brighter. Dark colors add warmth and coziness. Styles range from rustic wood to modern tile. Think about your furniture and wall colors before picking. Pick a style that fits your home’s vibe and your personal taste.
Measuring Your Space
Measure the length and width of the room in feet. Multiply these numbers for the total square footage. Add 10% extra for cutting and mistakes. Accurate measurements prevent running out of planks mid-project. Keep your measurements handy when buying your LVP flooring.

Credit: www.youtube.com
Preparing The Subfloor
Preparing the subfloor is the first step in laying luxury vinyl plank (LVP) flooring. A clean, level surface ensures the planks fit well and last longer. Taking time to prepare the subfloor can save effort later and prevent problems.
Cleaning The Surface
Start by removing all dirt and dust from the subfloor. Sweep or vacuum thoroughly to clear debris. A clean surface helps the adhesive stick better. Avoid leaving grease or oil, as it can cause slipping. Use a damp cloth for sticky spots and let the floor dry fully.
Checking For Level
Use a level tool to check the flatness of the subfloor. Look for dips, bumps, or uneven areas. Small differences can cause planks to shift or crack. Mark any problem spots to fix before installing. The subfloor should be flat within 1/8 inch over 6 feet for best results.
Repairing Imperfections
Fill cracks and holes with a suitable floor patch compound. Smooth the surface with a trowel and let it dry completely. Sand any rough patches to create a smooth finish. Remove loose nails or staples and replace damaged sections. A flawless subfloor provides a strong base for LVP flooring.
Gathering Tools And Materials
Gathering the right tools and materials is the first step in laying LVP flooring. Having everything ready helps the process go smoothly. It saves time and avoids frustration.
Knowing what you need makes the job easier. Prepare your workspace and check each item before starting. This way, you can focus on installing the floor without interruptions.
Essential Tools List
- Measuring tape for accurate cuts
- Utility knife with sharp blades
- Tapping block to fit planks tightly
- Pull bar for edges and corners
- Rubber mallet to avoid damage
- Square or straight edge for cutting
- Chalk line for straight rows
- Spacers to keep expansion gaps
Safety Gear
- Gloves to protect your hands
- Safety glasses to shield your eyes
- Knee pads for floor work comfort
- Dust mask to avoid inhaling particles
Additional Supplies
- Underlayment if your floor needs extra cushioning
- Moisture barrier for damp areas
- Cleaning cloth to wipe dust and debris
- Adhesive if your LVP requires glue
Acclimating The Flooring
Acclimating the flooring is an important step before installing LVP (Luxury Vinyl Plank) flooring. This process helps the flooring adjust to the room’s temperature and humidity. It prevents problems like warping, buckling, or gaps after installation. Taking time to acclimate the planks ensures a smooth and durable floor.
Why Acclimation Matters
LVP flooring expands and contracts with temperature changes. Without acclimation, planks may not fit well together. This can cause uneven surfaces or damage over time. Acclimation allows the material to stabilize. It helps the floor stay flat and secure after installation.
Recommended Time Frame
Place the LVP flooring in the room where it will be installed. Leave the boxes unopened but lay them flat on the floor. The flooring should stay there for at least 48 hours. For best results, keep the room temperature between 65°F and 85°F. This time lets the planks adjust to the room’s climate fully.
Planning The Layout
Planning the layout is the first step in laying LVP flooring. It helps create a smooth and attractive floor. Good planning saves time and avoids mistakes. This section guides you through important steps to plan your flooring layout.
Starting Point Choices
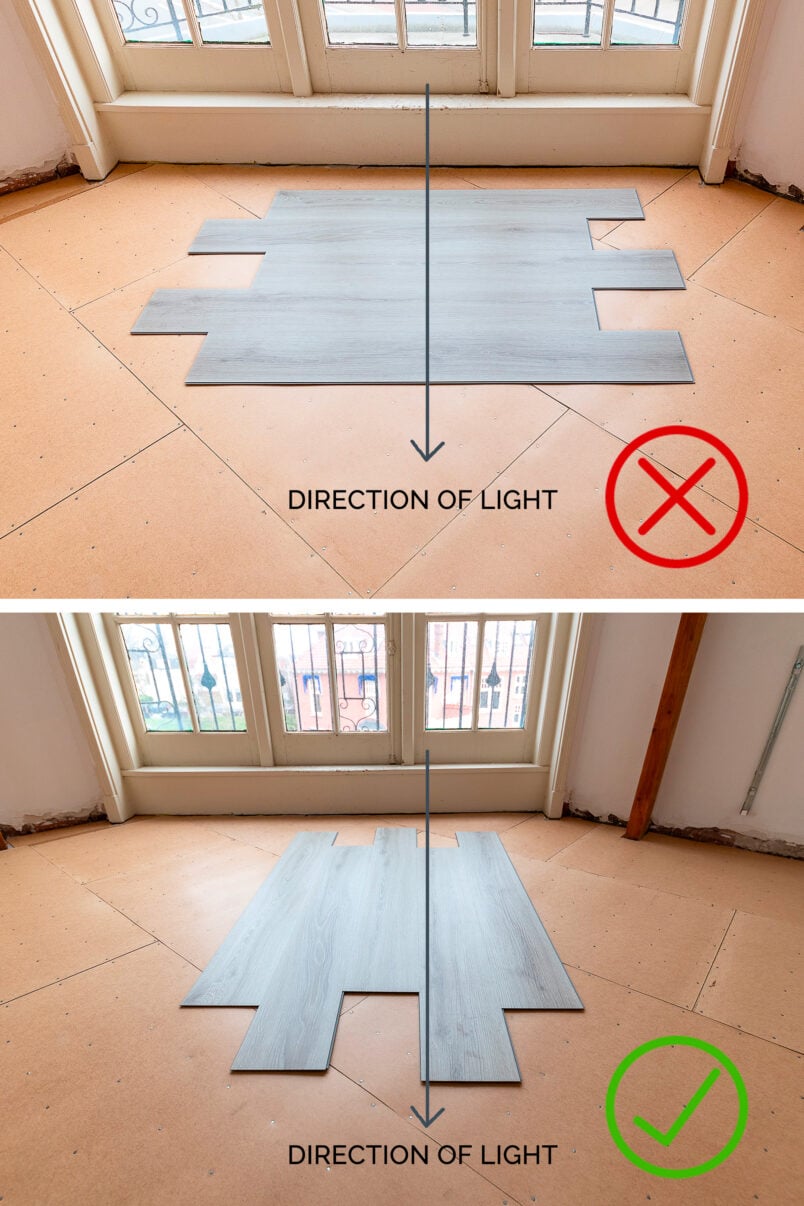
Choose where to start laying the planks. Start along the longest wall for a balanced look. Avoid starting near doorways or corners. Starting at a straight wall keeps planks aligned. Measure the room to find the best starting point.
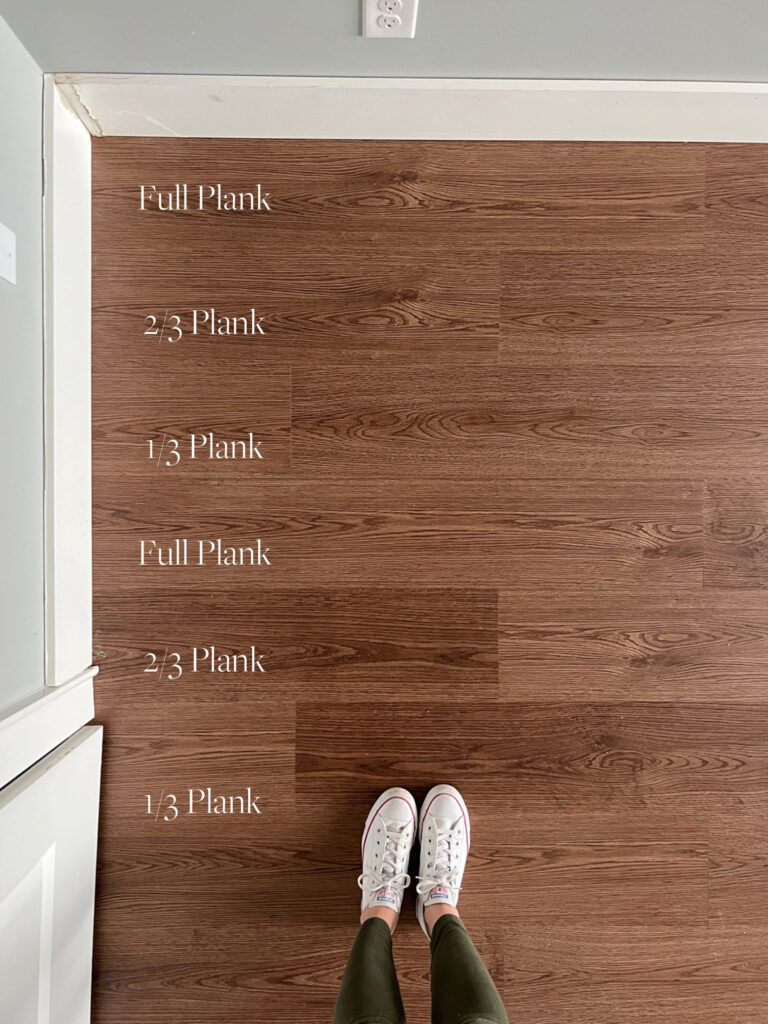
Aligning Planks
Align planks so seams do not line up in rows. Stagger the seams by at least 6 inches. This creates a natural, strong pattern. Use the plank’s tongue and groove to fit pieces tightly. Check alignment often to keep rows straight.
Spacing Considerations
Leave a small gap between planks and walls. This gap allows for floor expansion. Use spacers to keep the gap consistent. Usually, a 1/4 inch space works well. Cover the gap later with baseboards or trim.
Installing The Lvp
Installing LVP flooring is a straightforward process that many homeowners can do themselves. It offers durability and a stylish look. Proper installation ensures the floor lasts a long time and looks great.
There are different methods to install LVP, depending on your floor type and preference. Understanding each method helps you choose the best one for your project. Let’s explore the main ways to install LVP flooring.
Click-lock Installation
Click-lock is a popular method for installing LVP. The planks have edges that snap together without glue. This makes installation faster and cleaner.
Start by laying the first row along the longest wall. Make sure it is straight and leave a small gap for expansion. Then, click each plank into place by angling and pressing down. Use spacers to keep the gap consistent. Continue across the floor, staggering the seams for a natural look.
Glue-down Method
The glue-down method uses adhesive to secure planks to the subfloor. This creates a strong, permanent bond. It works well on concrete or uneven surfaces.
Begin by spreading the adhesive with a trowel. Work in small sections to prevent drying before the planks are placed. Press each plank firmly into the glue. Use a roller to remove air bubbles. Allow the glue to cure before walking on the floor.
Cutting And Fitting Planks
Cutting planks is necessary to fit edges and corners perfectly. A utility knife or saw works well for this task.
Measure carefully before cutting. Score the plank surface with a knife, then snap it along the score. For irregular shapes, use a jigsaw. Check each piece fits snugly without gaps. Take your time to ensure a clean, professional finish.
Finishing Touches
Finishing touches are key to completing your LVP flooring project. These steps improve the look and protect your floor. They ensure your floor lasts longer and looks great every day.
Installing Trim And Moldings
Trim and moldings cover the gaps between the floor and walls. They give a clean, polished look to your room. Use a nail gun or adhesive to fix them in place. Choose trim that matches your floor color for the best effect. Cut pieces carefully to fit corners neatly. This step hides uneven edges and adds style.
Cleaning The Floor
Cleaning removes dust and debris after installation. Sweep or vacuum gently to avoid scratching. Use a damp mop with water or a mild cleaner made for vinyl floors. Avoid harsh chemicals or abrasive tools. Dry the floor with a soft cloth to prevent water spots. Clean floors keep your home fresh and your floor shiny.
Maintaining Lvp Flooring
Regular care keeps your LVP floor in good shape. Sweep or vacuum often to stop dirt buildup. Wipe spills immediately to avoid stains. Use furniture pads to prevent scratches. Avoid dragging heavy items across the floor. Follow these tips to keep your floor looking new for years.
Credit: www.littlehouseonthecorner.com
Frequently Asked Questions
What Tools Do I Need To Lay Lvp Flooring?
You need a tape measure, utility knife, spacers, tapping block, and rubber mallet. A straight edge and pencil also help for accurate cuts.
How Do I Prepare The Floor Before Laying Lvp?
Clean the floor thoroughly and remove any old flooring or debris. Make sure the surface is flat, dry, and smooth for best results.
Can I Lay Lvp Flooring Over Existing Floors?
Yes, LVP can go over many floors like vinyl, tile, or wood if they are level and clean. Avoid carpet or uneven surfaces to prevent issues.
How Long Does It Take To Install Lvp Flooring?
It usually takes a few hours to a day for an average room. Time varies with room size and your experience level.
Final Words
Laying LVP flooring can change your room’s look quickly. Follow each step carefully for the best results. Take your time and measure twice before cutting. Keep the floor clean and flat for smooth installation. Enjoy the new, stylish floor you created yourself.
This simple project adds value and comfort to your home. Try it, and see how easy flooring can be.