Are you ready to transform your space with the timeless beauty of hardwood floors but worried about installing them over concrete? You’re not alone.
Installing hardwood on concrete can seem tricky, but with the right steps, it’s completely doable—and the results are stunning. In this guide, you’ll discover simple, clear instructions to help you achieve a flawless hardwood floor installation that lasts for years.
Keep reading, and you’ll gain the confidence and know-how to bring warmth and elegance to your home with ease.
Preparing The Concrete Surface
Preparing the concrete surface is a key step before installing hardwood floors. A clean and smooth base helps the wood last longer. It also prevents problems like warping or cracking. Take time to prepare the floor well. This will save effort later.
Cleaning And Drying
Start by removing all dirt and dust. Use a broom or vacuum to clean the surface. Check for grease or stains and scrub them off. After cleaning, let the floor dry completely. Moisture can stop the wood from sticking properly. Dry floors give the best results.
Checking For Moisture
Concrete often holds water inside. This moisture can damage hardwood floors. Use a moisture meter to test the surface. If moisture is high, wait for it to dry. You can also use a plastic sheet test. Tape a plastic sheet on the floor for 24 hours. If water forms under it, the floor is too wet.
Leveling The Floor
Hardwood floors need a flat surface. Check the floor for bumps or dips. Use a level tool to find uneven spots. Small bumps can be ground down. Fill dips with a concrete patch. Smooth and level floors help the wood fit tightly. This prevents gaps and squeaks later.

Credit: www.uptownfloors.com
Choosing The Right Hardwood
Choosing the right hardwood for installing on concrete is important. It affects the look, durability, and lifespan of your floor. Not all hardwood types work well on concrete surfaces. Some woods handle moisture better and last longer. Understanding the options helps you pick the best fit for your home and budget.
Types Of Hardwood Suitable For Concrete
Some hardwood species resist moisture and temperature changes better. Oak, maple, and hickory are popular choices. They are hard and stable, which helps on concrete floors. Exotic woods like Brazilian cherry can also work well. Avoid softwoods like pine as they dent easily and absorb moisture.
Choose hardwood with a good hardness rating and natural resistance. This reduces damage and keeps your floor looking new. Also, consider the color and grain to match your room style.
Engineered Vs Solid Hardwood
Engineered hardwood has layers of wood pressed together. The top layer is real wood, while the base layers add strength. This design makes it more stable on concrete. It handles moisture and temperature changes better than solid wood.
Solid hardwood is one piece of wood. It can expand and contract with humidity. This may cause gaps or warping on concrete floors. Solid wood usually needs a moisture barrier and extra care.
Engineered hardwood is easier to install on concrete. It offers good durability and a natural wood look. Solid hardwood works well if moisture is controlled and you prefer traditional flooring.
Gathering Necessary Tools And Materials
Starting a hardwood floor installation on concrete means preparing well. Gathering all tools and materials before you begin saves time and avoids interruptions. Having the right items ensures a smooth and strong floor fit. This step is crucial for a successful project.
List Of Tools
- Measuring tape – for accurate dimensions
- Chalk line – to mark straight lines
- Hammer or rubber mallet – to tap boards in place
- Power drill – for screwing and drilling holes
- Concrete grinder or scraper – to level the surface
- Moisture meter – to check concrete dampness
- Trowel – to spread adhesive evenly
- Saw (circular or miter) – to cut hardwood boards
- Knee pads – for comfort during work
- Utility knife – for trimming underlayment
Required Materials
- Hardwood flooring planks – choose your style and type
- Moisture barrier or vapor barrier – protects wood from dampness
- Underlayment – adds cushioning and soundproofing
- Adhesive or glue – secures wood to concrete
- Concrete patch or leveling compound – fills cracks and uneven spots
- Flooring nails or staples – for additional fastening if needed
- Wood filler – to cover gaps or nail holes
- Sandpaper – smooths rough edges
Installing A Moisture Barrier
Installing a moisture barrier is a key step before laying hardwood floors on concrete. Concrete can release moisture over time. This moisture can damage the wood, causing warping or mold growth. A moisture barrier stops this problem. It keeps the hardwood dry and secure. Choosing the right barrier and installing it properly makes the floor last longer.
Types Of Moisture Barriers
Plastic sheeting is a common moisture barrier. It is thin, easy to lay, and affordable. Use thick plastic, at least 6 mil, for good protection. Another option is a liquid-applied membrane. This forms a waterproof layer on the concrete. It works well in damp areas. Foam underlayment with a vapor barrier can also help. It cushions the floor and blocks moisture at once.
Installation Tips
Start with a clean, dry concrete surface. Remove dust and debris before laying the barrier. Overlap plastic sheets by 8 to 12 inches. Seal seams with waterproof tape to block moisture fully. Extend the barrier up the wall a few inches. This protects edges from dampness. Avoid puncturing the barrier while working. Check for holes and patch them quickly. Smooth installation prevents future problems with your hardwood floor.
Laying The Hardwood Floor
Laying hardwood floors on concrete requires careful steps to ensure a strong, lasting finish. This process starts well before placing any wood down. Proper preparation of the wood and floor helps avoid problems like warping or uneven boards. Follow these steps to lay your hardwood floor with confidence and precision.
Acclimating The Wood
Bring the hardwood planks inside the room where you will install them. Let them sit for 3 to 5 days. This helps the wood adjust to the room’s temperature and moisture. Wood expands and shrinks with humidity. Acclimating reduces the chance of gaps or buckling later.
Planning The Layout
Measure the room carefully before starting. Decide the direction the planks will run. Usually, boards go parallel to the longest wall or main light source. Mark a straight line to guide the first row. Plan for expansion gaps around the edges. These small spaces let the wood move naturally.
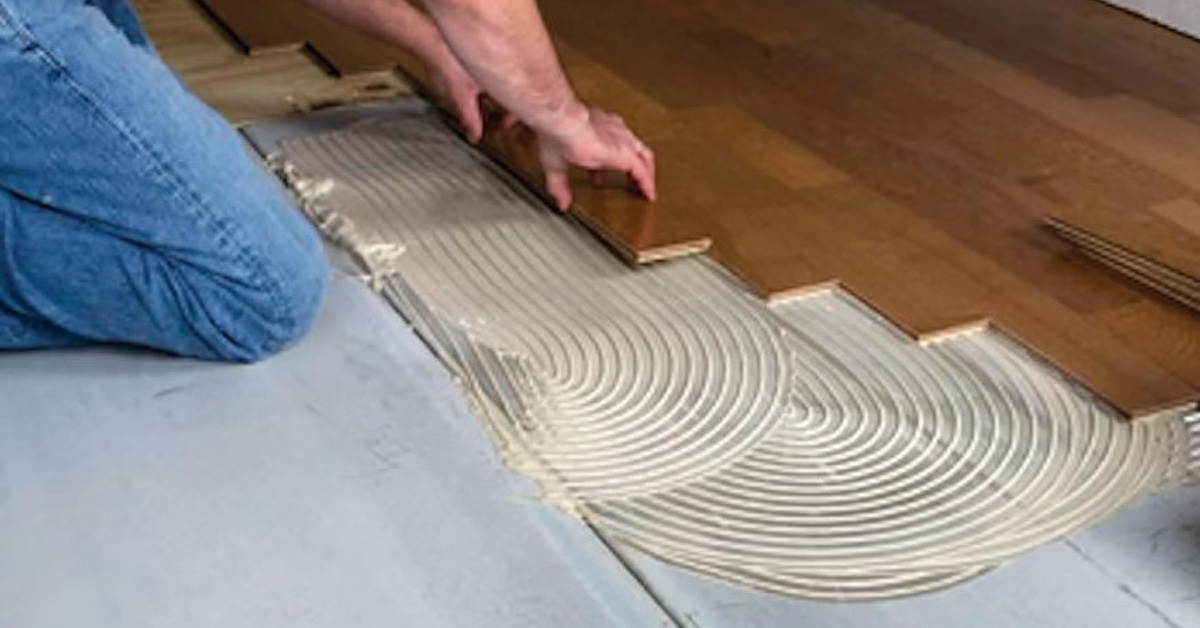
Installing The Planks
Begin by applying a moisture barrier or underlayment on the concrete floor. This protects the wood from dampness. Start laying the first row along the guide line. Use spacers to keep consistent gaps at the walls. Nail or glue the planks down according to the product instructions. Check each plank fits tightly before moving on. Stagger the joints for better stability and appearance.
Credit: www.sustainablelumberco.com
Finishing Touches
Finishing touches make your hardwood floor look complete and polished. These final steps create a smooth transition between the floor and the walls. They also protect your floor and keep it looking new for years.
Trimming And Molding
Trim and molding hide gaps between the floor and walls. Choose molding that matches your floor color for a neat look. Measure carefully before cutting to fit the space perfectly. Nail the trim gently to avoid damaging the floor. This step gives the room a clean, finished appearance.
Cleaning And Maintenance
Clean your new hardwood floor regularly to keep it shiny. Use a soft broom or vacuum to remove dust and dirt. Avoid wet mopping because water can damage the wood. Use a damp mop with a hardwood cleaner for deeper cleaning. Place rugs in high-traffic areas to protect the floor. Regular care will extend the life of your hardwood floor.
Common Mistakes To Avoid
Installing hardwood floors on concrete can be tricky. Many make simple mistakes that cause problems later. Avoiding these errors saves time and money. It also ensures a beautiful, long-lasting floor.
Focus on the details. Each step matters for a successful installation. Below are common mistakes to watch out for.
Not Checking Moisture Levels
Concrete can hold moisture, which damages hardwood. Skip this step and floors may warp or buckle. Always test the concrete’s moisture before installation. Use a reliable moisture meter for accurate results.
Skipping The Vapor Barrier
A vapor barrier stops moisture from reaching the wood. Not using one invites water damage and mold. Lay a high-quality vapor barrier over the concrete. It protects the wood and extends the floor’s life.
Ignoring Surface Preparation
Concrete must be clean and smooth. Dirt, dust, or bumps affect hardwood adhesion. Clean the surface well and fill cracks or holes. Sand rough spots to create a flat base for the floor.
Choosing Wrong Adhesive Or Fasteners
Not all adhesives suit hardwood on concrete. Use products designed for this job only. Wrong glue or nails can fail and ruin the floor. Follow manufacturer recommendations for best results.
Not Allowing Wood To Acclimate
Wood expands and contracts with moisture and temperature. Installing wood without acclimating causes gaps and buckling. Let hardwood sit in the room for several days before installation. This helps the wood adjust properly.

Credit: bigbrohardwood.com
Frequently Asked Questions
What Tools Do I Need To Install Hardwood Floors On Concrete?
You need a moisture barrier, underlayment, hardwood planks, adhesive, and a flooring nailer. Also, get a measuring tape, saw, and safety gear.
How Do I Prepare Concrete Before Hardwood Floor Installation?
Clean the concrete thoroughly and check for moisture using a test kit. Repair cracks and ensure the surface is flat and dry.
Can Hardwood Floors Be Glued Directly To Concrete?
Yes, use a high-quality adhesive designed for concrete and wood. Make sure the concrete is clean and dry for better bonding.
How Long Should Hardwood Floors Acclimate Before Installation?
Let hardwood planks sit in the room for 3 to 7 days. This helps wood adjust to room temperature and humidity.
Conclusion
Installing hardwood floors on concrete takes some care and patience. Prepare the surface well and choose the right materials. Follow each step slowly to avoid mistakes. The result is a strong, beautiful floor that lasts. Enjoy the warmth and style hardwood brings to your home.
Small efforts now save big repairs later. Ready to start? Your new floor awaits.