A hole in your hardwood floor can be frustrating to see every day. You might worry about how it will affect the look of your home or even your floor’s durability.
But here’s the good news: fixing that hole is easier than you think. You’ll discover simple, step-by-step methods to repair your hardwood floor quickly and effectively. By the end, you’ll feel confident restoring your floor’s beauty and strength without calling a professional.
Keep reading, and let’s get your floor looking great again!

Credit: diy.stackexchange.com
Identify The Hole Type
Before fixing a hole in your hardwood floor, first identify the type of hole. This step helps you choose the right repair method. Holes vary in size and depth. Some are shallow dents, while others are deep cracks or large gaps. Knowing the hole type saves time and materials. It also improves the final look of your floor.
Small Surface Dents
Small surface dents are shallow and often caused by heavy furniture or dropped objects. These dents usually do not break the wood surface. They look like small, pressed-in spots. Fixing them often requires simple methods like steam or filling with wood putty. These dents are the easiest to repair and restore.
Moderate Gouges
Moderate gouges are deeper than dents and may break the wood fibers. They often appear as scratches or small holes. These gouges need more attention to fill and smooth. You may use wood filler or wax sticks. Sanding and refinishing might be required for a smooth finish. These repairs take more time but improve floor appearance.
Large Holes And Cracks
Large holes and cracks are serious damage that affects floor stability. They can occur from heavy impact or wood shrinkage. Filling these holes requires strong wood filler or a patch piece. Sometimes, replacing the damaged plank is necessary. This type of repair needs more tools and skills. It ensures your floor stays strong and looks good.
Gather Repair Materials
Before fixing a hole in your hardwood floor, gather all repair materials. Having everything ready saves time and makes the process smooth. Choose the right materials based on the size and depth of the hole. Proper tools and safety gear are also important for a clean, safe repair.
Wood Filler Options
Wood filler fills holes and cracks in hardwood floors. There are two common types: water-based and solvent-based fillers. Water-based fillers dry fast and clean easily with water. Solvent-based fillers are stronger and work well for deep holes. Pick a filler that matches your floor’s color. Some fillers can be sanded and stained for a better blend.
Tools Needed
Use a putty knife to apply the wood filler smoothly. Sandpaper is necessary to smooth the surface after drying. A vacuum or brush helps remove dust before repair. You may also need a small container for mixing filler. Choose tools that fit your hand comfortably for better control.
Safety Gear
Wear gloves to protect your hands from filler chemicals. Use a mask to avoid inhaling dust and fumes. Safety glasses prevent dust from getting into your eyes. Work in a well-ventilated area to reduce exposure to fumes. Following safety steps keeps the repair process safe and easy.
Prepare The Damaged Area
Preparing the damaged area is the first key step to fix a hole in your hardwood floor. This step ensures the repair materials stick well and the fix looks smooth. Take your time to get the surface ready before moving on to filling the hole.
Clean The Surface
Start by cleaning the area around the hole. Use a soft cloth or vacuum to remove dust and dirt. A clean surface helps the repair materials bond better. Avoid using water, as moisture can damage the wood further.
Remove Loose Debris
Check inside the hole for any loose wood pieces or splinters. Gently pull out or brush away these bits. Loose debris can cause the repair to fail or look uneven. Clear the hole so it is smooth and ready for filling.
Sand Around The Hole
Lightly sand the edges of the hole with fine-grit sandpaper. This roughens the surface just enough for better adhesion. Sand in small circles and avoid making the hole larger. Wipe away dust after sanding to keep the area clean.
Apply Wood Filler
Applying wood filler is a key step to fix holes in hardwood floors. It fills gaps and smooths the surface for a clean look. Choosing the right filler and applying it correctly makes the repair strong and lasting.
Mixing And Applying Filler
Start by selecting a wood filler that matches your floor color. Some fillers come pre-mixed, while others need mixing. Follow the package instructions carefully. Use a putty knife to stir and mix the filler well. Apply the filler with the knife, pressing it into the hole. Smooth the surface to be level with the floor. Let the filler dry completely before sanding.
Filling Small Holes
Small holes are easy to fill with a simple touch of wood filler. Use a small putty knife or even a plastic scraper. Press the filler gently into the hole. Remove any extra filler around the edges. Wait for the filler to dry, then sand lightly. This will make the repair blend well with the floor.
Addressing Larger Gaps
Larger gaps need extra care to fill properly. First, clean the hole from dust and loose wood. For deep gaps, apply filler in layers. Let each layer dry before adding the next. Use a putty knife to press the filler firmly. After the final layer dries, sand it smooth. This method prevents cracking and ensures a solid repair.
Sand And Smooth Repair
Sand and smooth repair is a key step in fixing a hole in a hardwood floor. It helps create a flat, even surface. This step prepares the floor for finishing and makes the repair less visible. Proper sanding also improves the wood’s appearance and feel.
Choosing The Right Sandpaper
Start with medium-grit sandpaper, around 80 to 120 grit. This removes rough edges and levels the filler or patch. Use finer grit, like 180 to 220, for the final sanding. It smooths the surface and blends it with the wood grain. Avoid using too coarse sandpaper. It can damage the floor or create deep scratches.
Blending With Surrounding Floor
Sanding should extend slightly beyond the repair area. This helps blend the patch with the rest of the floor. Use gentle, even strokes following the wood grain. Check the surface often. The goal is a seamless transition without visible edges. Stop sanding as soon as the repair feels smooth and level.
Dust Removal
Remove all dust before finishing the floor. Use a vacuum with a brush attachment first. Then wipe the area with a damp cloth or tack cloth. Dust can cause bumps and uneven finish. Clean surfaces make stains and sealers stick better. This step ensures a neat, professional look.

Credit: diy.stackexchange.com
Stain And Finish
Staining and finishing the repaired area is key to restoring your hardwood floor’s look. This step blends the patch with the rest of the floor. It also protects the wood from damage and wear. Proper stain and finish make the repair less noticeable and last longer.
Matching Floor Color
Start by finding a stain color close to your floor. Test different stains on a small wood piece. Compare them in natural light. Choose the one that fits best with your floor tone. Mixing stains can help match unique colors. Take your time to get the perfect match.
Applying Stain
Apply the stain carefully using a clean cloth or brush. Work in thin, even coats for best results. Let the stain soak into the wood for a few minutes. Wipe off extra stain with a dry cloth. Repeat until the color matches your floor. Allow the stain to dry fully before the next step.
Sealing The Repair
Seal the stained area with a clear finish to protect it. Use polyurethane or a similar wood finish. Apply thin coats with a brush, letting each dry well. Lightly sand between coats for smoothness. Finish with 2 to 3 layers for durability. This seals the repair and blends it with the floor shine.
Prevent Future Damage
Preventing future damage is key to keeping hardwood floors beautiful and strong. Small holes or dents can turn into bigger problems if the floor is not protected. Taking simple steps helps keep your floor safe and looking new for longer.
Use Floor Protectors
Floor protectors are small pads placed under furniture legs. They stop scratches and dents caused by moving furniture. Felt pads and rubber caps work well for most furniture. Replace worn protectors regularly to keep the floor safe.
Regular Maintenance Tips
Clean hardwood floors often with a soft broom or vacuum. Avoid wet mopping because water can damage wood. Use a damp cloth for sticky spots only. Apply wood polish or wax to protect the surface and keep it shiny.
Avoiding Heavy Impact
Heavy objects can cause dents or holes in hardwood floors. Lift items instead of dragging them across the floor. Use rugs in high-traffic areas to cushion impact. Teach children to avoid jumping or dropping heavy toys on the floor.
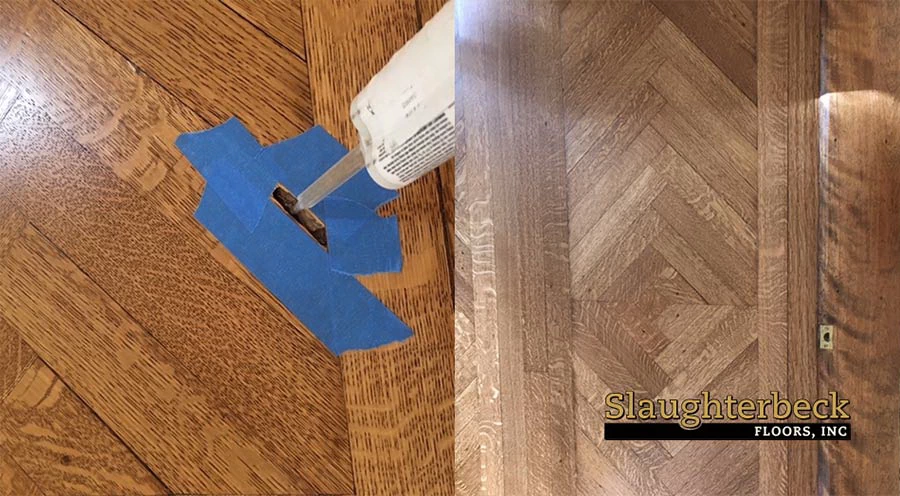
Credit: www.slaughterbeckfloors.com
Frequently Asked Questions
How Do I Repair A Small Hole In Hardwood Flooring?
To fix a small hole, fill it with wood filler that matches your floor color. Let it dry, then sand it smooth and apply a finish.
Can I Fix A Large Hole In Hardwood Floors Myself?
Yes, you can replace the damaged plank or use a wood patch kit. Careful measuring and matching wood color are important for a good result.
What Tools Are Needed To Fix Holes In Hardwood Floors?
Basic tools include wood filler or patch, putty knife, sandpaper, and finish or stain. For large holes, a saw and replacement plank may be required.
How Long Does It Take To Fix A Hole In Hardwood Flooring?
Small holes can be fixed in a few hours, including drying time. Larger repairs may take a day or two to complete properly.
Conclusion
Fixing a hole in your hardwood floor does not have to be hard. With the right tools and steps, you can make it look like new. Small holes heal well with wood filler, while bigger ones may need a patch.
Take your time and follow each step carefully. Your floor will look smooth and clean again. This simple repair saves money and keeps your home beautiful. Give your hardwood floor the care it deserves today.