Are your vinyl floor grout lines looking cracked, dirty, or worn out? You’re not alone, and the good news is you don’t have to replace your entire floor to fix this.
Filling grout lines can make your vinyl flooring look fresh and clean again, and it’s easier than you might think. In this guide, you’ll discover simple steps to fill those grout lines effectively, saving you time and money. Ready to transform your floor and boost your home’s appeal?
Let’s get started!
Tools And Materials Needed
Filling grout lines in vinyl flooring needs the right tools and materials. Using proper items makes the job easier and the results better. Gather everything before you start to avoid interruptions.
Essential Tools
Prepare a grout float to spread grout smoothly. Use a sponge to clean excess grout. A small bucket is helpful for mixing grout. Have a utility knife ready to remove old grout. A putty knife can help push grout into narrow lines. Keep a clean cloth nearby for wiping.
Choosing The Right Grout
Select grout made for vinyl flooring or flexible grout. This type prevents cracking as vinyl moves slightly. Choose a color that matches or complements your floor. Pre-mixed grout is easy for beginners. Powder grout offers stronger adhesion but needs mixing. Read labels carefully to find grout suited for vinyl.
Safety Gear
Wear gloves to protect your hands from grout chemicals. Use safety glasses to avoid grout splashes in your eyes. A dust mask prevents inhaling grout powder during mixing. Good ventilation helps reduce fumes. Dress in old clothes to avoid stains. Safety first keeps the job safe and smooth.
Preparing The Vinyl Floor
Preparing the vinyl floor is a key step before filling grout lines. It ensures the new grout sticks well and lasts longer. This preparation avoids problems like peeling or cracking later on. Follow these steps carefully to get the best results.
Cleaning The Surface
Start by cleaning the vinyl surface thoroughly. Remove all dust, dirt, and grease. Use a mild detergent and warm water for cleaning. Avoid harsh chemicals that can damage the vinyl. Wipe the floor with a soft cloth or mop. Let the floor dry completely before the next step.
Removing Old Grout
Check the grout lines for any old or loose grout. Use a grout removal tool or a plastic scraper. Be gentle to avoid scratching the vinyl. Remove all weak grout pieces to create a smooth base. This helps new grout bond better to the surface.
Drying And Inspection
After cleaning and removing old grout, let the floor dry fully. Inspect the grout lines for cracks or damage. Fix any issues before applying new grout. Dry and clean grout lines give the best result and durability.
Mixing And Applying Grout
Mixing and applying grout for vinyl flooring is an important step. It fills gaps and strengthens the floor. Proper mixing and application ensure a smooth, long-lasting finish. Follow these steps for the best results.
Mixing To The Right Consistency
Start by adding grout powder to a clean bucket. Slowly add water while stirring. The mixture should be thick but spreadable. Think of peanut butter thickness. Avoid making it too runny or too dry. Let the grout sit for a few minutes. Stir again before applying.
Applying Grout To Lines
Use a small tool or your finger to push grout into the lines. Work in small sections for better control. Press grout firmly to fill all gaps. Remove excess grout from the surface quickly. This prevents hard-to-clean residue later.
Using A Grout Float
A grout float helps spread grout evenly over the floor. Hold it at a 45-degree angle. Move the float diagonally across the lines. This pushes grout deep into the gaps. Clean the float often to avoid clumps. After filling, wipe the surface with a damp sponge. This smooths the grout and cleans extra material.
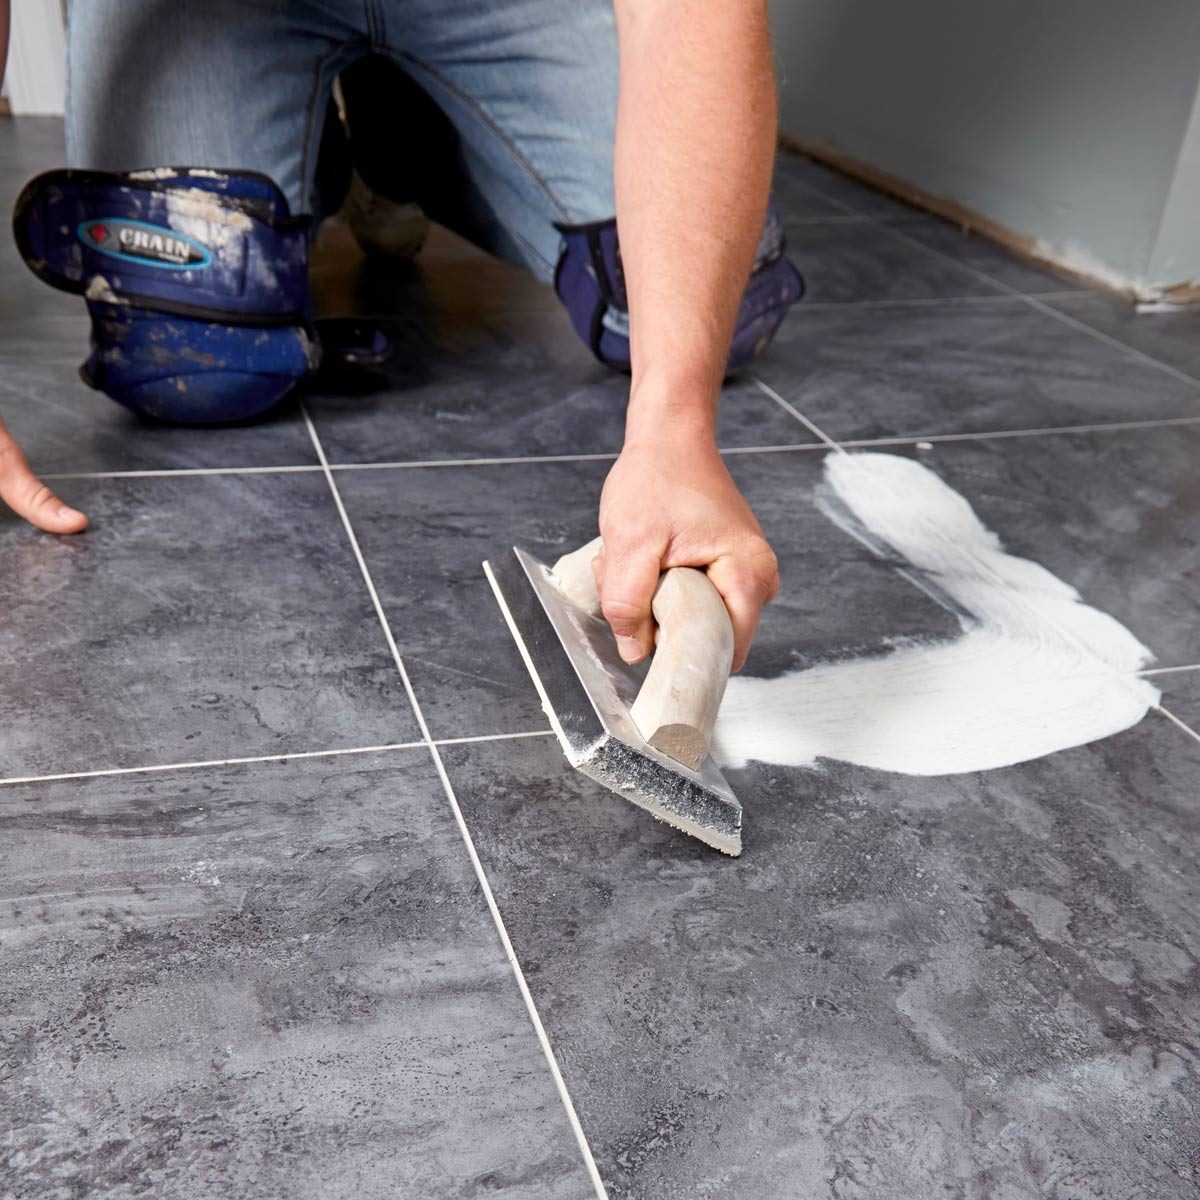
Credit: www.familyhandyman.com
Smoothing And Finishing
Smoothing and finishing grout lines for vinyl flooring is a key step. It makes the floor look neat and professional. This process helps grout set evenly and prevents rough spots. Proper finishing also protects grout from cracking and wearing out quickly.
Removing Excess Grout
After applying grout, remove extra material quickly. Use a damp sponge to wipe the surface gently. Avoid pressing hard to keep grout in the lines. Cleaning excess grout early stops it from drying on the floor. This step saves time and keeps the floor clean.
Smoothing Edges
Run a rounded tool or your finger along grout lines. This shapes the grout and smooths rough edges. Work carefully to keep grout inside the joints. Smooth edges help grout bond well and look tidy. Do this before grout begins to harden.
Cleaning After Application
Wait for grout to set, then clean the floor surface. Use a soft cloth or sponge with water to remove haze. Avoid harsh chemicals that can damage grout or vinyl. Dry the floor with a clean towel to prevent streaks. This step reveals the final look of your work.
Curing And Maintenance Tips
Proper curing and maintenance ensure your grout lines last long and look good. This step protects the grout from cracking and stains. Follow these tips carefully to keep your vinyl flooring neat and durable.
Drying Time And Conditions
Allow grout to dry fully before walking on it. Usually, drying takes 24 to 48 hours. Keep the area dry and avoid humidity during this time. Good air flow speeds up drying. Avoid heavy furniture or rugs on grout lines until fully set.
Sealing Grout Lines
Sealing grout protects it from dirt and moisture. Use a grout sealer made for vinyl floors. Apply the sealer evenly with a small brush or sponge. Let it dry completely before allowing foot traffic. Reseal grout every six months for best results.
Routine Cleaning Advice
Clean grout lines regularly to prevent buildup. Use a soft brush and mild soap with warm water. Avoid harsh chemicals that can damage grout and vinyl. Wipe spills immediately to stop stains. Dry grout after cleaning to avoid mold growth.

Credit: www.blesserhouse.com
Common Mistakes To Avoid
Filling grout lines in vinyl flooring may seem easy. Yet, many people make mistakes that cause poor results. Avoiding these errors saves time and money. It also improves the look and durability of your floor.
Applying Too Much Grout
Using too much grout can cause it to crack or crumble. Excess grout also makes cleaning harder. Apply grout in small amounts and press firmly into the lines. Wipe off extra grout quickly with a damp cloth. This keeps the surface smooth and neat.
Ignoring Surface Preparation
Cleaning the vinyl surface is essential before grouting. Dirt or dust stops grout from sticking well. Remove all debris and dry the floor completely. Check the grout lines for damage or loose pieces. Repair these before filling grout lines for best results.
Using Incorrect Grout Type
Not all grout works well with vinyl floors. Cement-based grout can crack or stain vinyl. Choose a flexible, vinyl-compatible grout for durability. Read product labels to find the right type. Using the correct grout protects your flooring and extends its life.

Credit: www.youtube.com
Frequently Asked Questions
What Materials Do I Need To Fill Grout Lines In Vinyl Flooring?
You need grout filler, a grout float or putty knife, a sponge, and a bucket of water. Choose a grout product suitable for vinyl floors to avoid damage.
How Long Does It Take For Grout To Dry On Vinyl Flooring?
Grout usually takes 24 to 48 hours to fully dry and cure. Avoid walking on the floor during this time to prevent cracks.
Can I Use Regular Grout For Vinyl Flooring Grout Lines?
Regular grout may crack or not adhere well on vinyl surfaces. Use a flexible grout designed for vinyl or vinyl-specific filler products.
How Often Should Grout Lines In Vinyl Flooring Be Refilled?
Grout lines should be checked every 1 to 2 years for cracks or gaps. Refill grout when you notice wear or dirt buildup to maintain appearance.
Final Words
Filling grout lines in vinyl flooring keeps your floor looking neat and clean. It also stops dirt and moisture from building up. Use the right grout and tools for the best results. Take your time and work carefully. Small steps make a big difference.
Your floor will stay strong and fresh for years. Easy to do, worth the effort. Try it yourself and see the improvement.