Are you thinking about giving your home a fresh, timeless look with hardwood flooring? Installing hardwood floors might seem tricky at first, but once you understand the steps, it becomes much easier than you expect.
Imagine walking barefoot on smooth, warm wood that adds charm and value to your space. You’ll discover exactly how hardwood flooring is installed, from preparing your room to the final polish. By the end, you’ll feel confident and ready to transform your floors with ease.
Keep reading to unlock the secrets of a beautiful hardwood floor installation!
:strip_icc()/101206836-29035ec5a7c34a12a4c00cd5101818d4.jpg)
Credit: www.bhg.com
Choosing The Right Hardwood
Choosing the right hardwood is the first step in installing beautiful floors. The type of wood affects the look and durability. It also impacts the room’s style and feel. Picking the right hardwood helps ensure your floors last for years.
Types Of Hardwood
Hardwood comes in many types. Oak, maple, and cherry are popular choices. Oak is strong and has a classic grain. Maple is hard and light-colored. Cherry offers a rich, warm tone. Each wood type has its own color and pattern. Consider the room’s use and style before choosing.
Selecting The Finish
The finish protects the wood and adds shine. Matte finishes give a natural look. Glossy finishes reflect light and look bright. Satin finishes fall between matte and glossy. Some finishes resist scratches and stains better. Choose a finish that fits your lifestyle and decor.
Measuring Your Space
Measure the room carefully before buying hardwood. Measure length and width in feet. Multiply to get the total square footage. Add 10% extra for waste and cuts. Accurate measurement helps avoid delays and extra costs. It also ensures you buy enough wood for your project.
Preparing The Subfloor
Preparing the subfloor is the first step in installing hardwood flooring. It creates a solid base that supports the wood and prevents future problems. A well-prepared subfloor keeps the hardwood flat and stable for years.
This step involves cleaning, leveling, and testing for moisture. It also includes adding an underlayment to protect the wood. Each part is crucial to ensure the flooring lasts long and looks great.
Cleaning And Leveling
Start by removing all dirt, dust, and debris from the subfloor. A clean surface helps the hardwood glue or nails stick better. Check the subfloor for bumps or low spots.
Use a leveling compound to fill gaps or cracks. Sand down high spots to create a flat surface. A level subfloor prevents the hardwood from warping over time.
Moisture Testing
Moisture can damage hardwood floors by causing them to swell or shrink. Test the subfloor for moisture using a moisture meter. Follow the manufacturer’s moisture limits for hardwood installation.
If moisture is too high, fix the problem before proceeding. Use a vapor barrier to protect the wood from moisture. This step prevents future flooring issues like mold or warping.
Installing Underlayment
Underlayment is a thin layer placed between the subfloor and hardwood. It acts as a cushion and reduces noise when walking. It also helps to protect the wood from moisture coming from below.
Roll out the underlayment smoothly and cut it to fit the room size. Tape the seams tightly to create a continuous barrier. Proper underlayment improves comfort and extends the floor’s life.
Acclimating The Wood
Acclimating the wood is a key step in installing hardwood flooring. It means letting the wood adjust to the room’s temperature and humidity. This helps prevent problems like warping or gaps after installation. Taking time for acclimation makes the floor last longer and look better.
Why Acclimation Matters
Wood reacts to changes in moisture and temperature. It expands or shrinks depending on the air around it. Without acclimation, the wood may change size after installation. This causes cracks, gaps, or buckling in the floor. Acclimating the wood reduces these risks. It ensures the floor fits perfectly and stays stable.
Proper Acclimation Process
Start by opening the wood packages in the room where it will be installed. Spread the wood boards out, not stacked tightly. Let them sit for at least 3 to 7 days. Maintain room temperature and humidity close to normal living conditions. Use a moisture meter to check the wood’s moisture level. The wood is ready when its moisture matches the room’s level. This careful process helps the floor settle correctly before installation.
Laying Out The Floor
Laying out the floor is a key step in installing hardwood flooring. It sets the foundation for a smooth, even, and beautiful floor. Proper layout helps avoid mistakes and saves time during installation. This stage involves careful measuring, marking, and deciding the best direction for the boards.
Planning The Layout
Start by measuring the room’s length and width. Write down these numbers. Calculate how many hardwood boards you need to cover the space. Think about the room’s shape and any obstacles like doorways or vents. Plan where the first row will go. This row is very important because it guides the rest of the floor.
Marking Reference Lines
Use a chalk line to mark straight reference lines on the subfloor. These lines help keep the boards aligned. Start with a line parallel to the longest wall. Check that the lines are square by measuring the corners. Mark additional lines if needed for complex spaces. Clear lines prevent crooked rows and gaps between boards.
Deciding On Direction
Choose the direction to lay the boards carefully. Usually, boards run parallel to the longest wall. This makes the room look bigger and the floor stronger. Consider the light source too. Boards placed parallel to windows show fewer seams. Also, think about the room’s use and traffic flow. Good direction improves both look and durability.
Installing The Hardwood
Installing hardwood flooring requires care and precision. This step shapes the look and feel of your space. Proper installation ensures durability and beauty for years. Each part of the process has its role. Below, learn key techniques to install hardwood floors correctly.
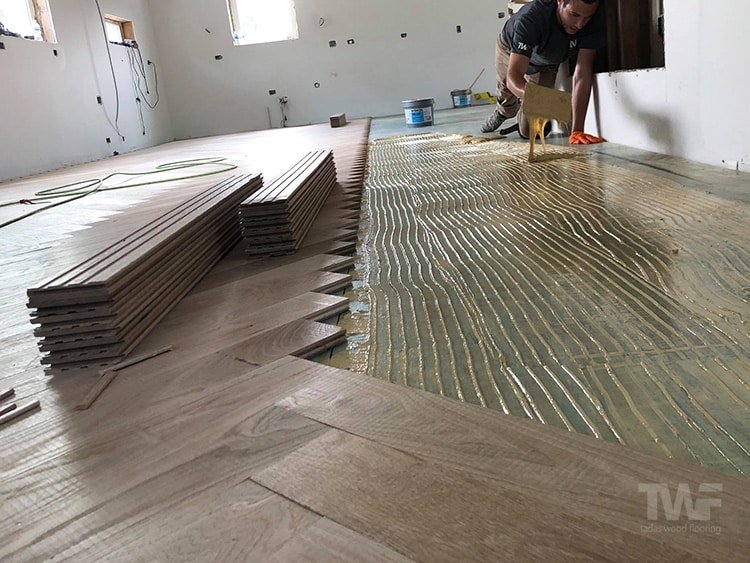
Nailing Vs. Gluing
Hardwood floors attach to the subfloor by nailing or gluing. Nailing uses special nails to hold boards firmly in place. It works well for solid hardwood and plywood subfloors. Gluing spreads adhesive on the subfloor to stick the boards down. This suits engineered hardwood and concrete bases. Choosing the right method depends on your floor type and subfloor material.
Starting The First Row
Begin along the longest, straightest wall in the room. Place the first board with its groove facing the wall. Leave a small gap for expansion between the board and wall. This space allows the wood to expand without damage. Secure the first row carefully; it sets the pattern for the rest.
Staggering The Boards
Lay boards so end joints do not line up. Stagger the joints by at least six inches. This pattern makes the floor stronger and more stable. It also creates a natural, attractive look. Avoid short rows that weaken the floor structure.
Fitting Around Obstacles
Cut boards to fit around door frames, vents, or pipes. Use a jigsaw or coping saw for curved cuts. Measure carefully to ensure a tight fit without gaps. Small gaps can be covered with trim or molding. Take time with these details for a clean finish.
Credit: napervillehardwood.com
Finishing Touches
Finishing touches make hardwood flooring look perfect and last longer. After installation, these final steps protect the wood and improve its beauty. Each step adds smoothness and shine. These details create a polished, clean look.
Sanding And Buffing
Sanding smooths the surface of the hardwood. It removes small bumps and uneven spots. Buffing follows to make the floor shine. This step also opens the wood pores. It helps the finish stick better. The result is a smooth, even floor.
Applying Sealant Or Finish
The sealant protects wood from water and dirt. It keeps the floor strong and clean. Finish options include oil, polyurethane, or wax. They add shine and color. Applying thin coats ensures even coverage. Each layer must dry before the next.
Installing Baseboards And Molding
Baseboards cover gaps between floor and wall. Molding adds a decorative touch. Both hide expansion spaces around the floor. They give the room a neat, finished look. These pieces are nailed or glued in place. They complete the hardwood flooring installation.
Maintenance Tips
Hardwood flooring looks beautiful and lasts a long time. Proper care keeps it shining and strong. Follow these maintenance tips to protect your floor every day. Simple steps help avoid damage and keep floors clean.
Cleaning Best Practices
Sweep or vacuum your hardwood floor regularly. Use a soft broom or vacuum with a floor brush. This removes dust and dirt that scratch the surface. Clean spills right away to prevent stains. Use a damp mop with a wood floor cleaner. Avoid soaking the floor with water. Dry the floor after mopping to stop water damage.
Preventing Damage
Place felt pads under furniture legs. These stop scratches when moving furniture. Use rugs in high-traffic areas to reduce wear. Avoid walking on hardwood floors with high heels. Keep pet nails trimmed to prevent scratches. Control indoor humidity to stop wood from warping. Use a humidifier in dry months and a dehumidifier in wet months.
Refinishing When Needed
Over time, hardwood floors may lose their shine. Scratches and dents can appear. Refinishing restores the floor’s smooth, fresh look. Sand the surface lightly, then apply a new finish. This process removes minor damage and renews protection. Plan refinishing every 7 to 10 years depending on use. Hire a professional for the best results.

Credit: www.homedepot.com
Frequently Asked Questions
What Are The Main Steps For Hardwood Flooring Installation?
Hardwood flooring installation starts with preparing a clean, dry subfloor. Next, the boards are laid, nailed, or glued down carefully. Finally, sanding and finishing create a smooth, polished surface.
How Long Does Hardwood Flooring Installation Usually Take?
Installation time depends on room size and floor type. Most rooms take 2 to 5 days from start to finish. This includes preparation, laying boards, and finishing.
Can Hardwood Flooring Be Installed Over Existing Floors?
Yes, hardwood can go over some floors like plywood or concrete. The old floor must be level, clean, and dry. Always check specific guidelines for your flooring type.
What Tools Are Needed For Hardwood Floor Installation?
Basic tools include a saw, hammer, tape measure, and nailer. A moisture meter helps check subfloor dryness. Safety gear like gloves and goggles is also important.
Conclusion
Installing hardwood flooring takes careful planning and the right tools. Measure your space to buy enough wood planks. Prepare the floor surface by cleaning and leveling it well. Lay the boards tightly, leaving small gaps for expansion. Use nails or glue depending on the type of wood.
Take your time to ensure each piece fits perfectly. The result is a strong, beautiful floor that lasts for years. Hardwood floors add warmth and value to any home. Simple steps, great results.