Is your hardwood floor looking dull or scratched? You don’t have to replace it to bring back its shine.
Hardwood floor restaining is a simple and affordable way to refresh your space. Imagine walking into a room where your floors look brand new—rich, warm, and full of life. You’ll discover how restaining can transform your floors, the steps involved, and tips to get the best results.
Ready to give your hardwood the makeover it deserves? Keep reading to learn how easy it can be.
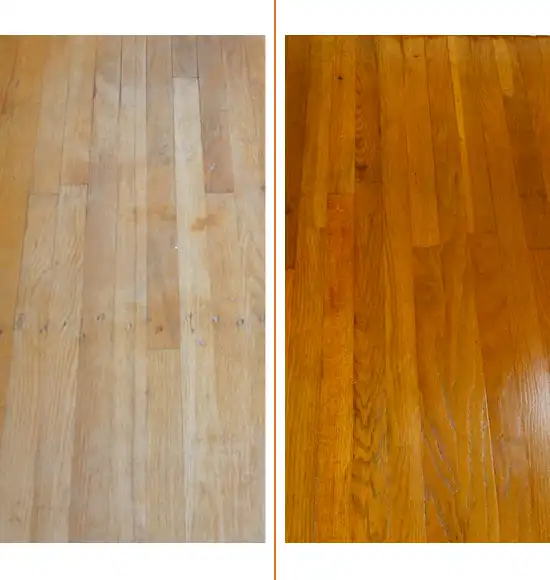
Benefits Of Restaining Hardwood Floors
Restaining hardwood floors brings many benefits to your home. It refreshes old floors and gives them a new look. This process can change the color and tone, making the wood look fresh and clean.
Choosing to restain is a smart way to improve your floors without replacing them. It protects the wood and helps it last longer. Below are some key benefits of restaining hardwood floors.
Enhance Natural Beauty
Restaining highlights the wood’s natural grain and patterns. It deepens the color and adds warmth to the room. The floor looks smooth and polished, improving the overall feel of your space.
Increase Home Value
Well-maintained floors attract buyers and raise property value. New stains make floors look newer and well cared for. This small update can make your home more appealing on the market.
Cost-effective Makeover
Restaining costs less than installing new floors. It saves money and time while giving a fresh appearance. This makeover is a budget-friendly way to improve your home’s style.
Credit: www.nhance.com
Choosing The Right Stain Color
Choosing the right stain color for your hardwood floor restaining is important. The color changes the room’s mood and style. It also affects how the floor shows dirt and wear. Picking the right shade helps make your space feel just right. Consider the style of your home and your personal taste. A good stain color lasts a long time and looks great every day.
Popular Color Trends
Dark stains like espresso and walnut are popular now. They add a rich, elegant look. Light stains such as natural oak and honey give a fresh, airy feel. Gray tones are trendy for modern homes. These colors hide scratches better. Choose a trend that fits your style and the home’s age.
Matching Your Décor
The floor color should match your furniture and walls. Warm colors go well with traditional wood furniture. Cooler colors fit modern, minimalist styles. Think about the room size too. Light colors make small rooms feel larger. Dark colors add coziness to big spaces. Balance the floor color with your décor’s mood.
Testing Stain Samples
Always test stain samples on a small floor area. The wood type changes how the stain looks. Natural light affects color too. Let the sample dry fully before deciding. Try different shades to see which fits best. Testing avoids costly mistakes and ensures satisfaction.
Preparing Floors For Restaining
Preparing floors for restaining is a crucial step in achieving a beautiful, lasting finish. It ensures the stain adheres well and looks even across the entire surface. Proper preparation involves cleaning, repairing, and removing old finishes. Each task sets the stage for a smooth and successful restaining process.
Cleaning And Sanding
Start by thoroughly cleaning the floor to remove dust and dirt. Use a vacuum and damp mop for the best results. Sanding the floor next helps remove surface imperfections and opens the wood grain. This step allows the stain to soak in evenly. Use a floor sander with medium-grit sandpaper for large areas. Finish with fine-grit sandpaper for a smooth surface.
Repairing Damages
Check for cracks, holes, or scratches in the wood. Fill these with wood filler that matches the floor color. Let the filler dry completely before sanding it smooth. Repairing damages creates a uniform surface. This prevents stains from pooling or appearing blotchy in damaged areas. Take your time to ensure all flaws are fixed.
Removing Old Finish
Old finishes like varnish or polyurethane must be removed before restaining. Use a chemical stripper or sand the floor to strip the old finish. Removing the finish exposes fresh wood. This step is vital for stain absorption and final appearance. Avoid skipping this step to prevent uneven color and poor adhesion.
Restaining Techniques And Tips
Restaining hardwood floors refreshes their look and protects the wood. Using the right techniques ensures a smooth, even finish. This section covers key tips for applying stain, drying, and sealing your floors. Follow these steps to get great results.
Applying Stain Evenly
Begin by cleaning the floor well to remove dust and dirt. Use a brush or cloth to apply the stain. Work in small sections to control coverage. Apply the stain along the wood grain for a natural look. Avoid pooling or heavy spots by wiping off excess stain quickly. Check the color often and add more stain if needed. Keep a steady hand to prevent streaks or blotches.
Drying Time Considerations
Let the stain dry fully before touching the floor. Drying time depends on the stain type and room conditions. Warm, dry air speeds up drying. Cold or humid rooms slow it down. Avoid walking on floors too soon to stop marks. Plan for at least 24 hours drying time. Check the manufacturer’s instructions for exact times. Patience helps the stain set properly and last longer.
Using Protective Finishes
After staining, protect floors with a clear finish. Polyurethane is popular for its strong protection. Choose between water-based or oil-based finishes. Water-based dries faster and has less odor. Oil-based offers a richer look and more durability. Apply thin, even coats with a brush or roller. Let each coat dry before adding the next. This seal keeps floors safe from scratches and spills.
Common Mistakes To Avoid
Restaining hardwood floors can refresh your space and add warmth. Avoiding common mistakes ensures a smooth, lasting finish. Many make errors that cause uneven color or damage. Knowing what to avoid saves time and money.
Skipping Surface Prep
Proper surface preparation is key. Dirt, old finish, and scratches stop stain from soaking in. Sanding removes old layers and smooths the wood. Clean the floor fully before staining. Skipping this step results in blotchy, uneven color.
Choosing Poor Quality Products
Low-quality stains and finishes wear out fast. They can fade or peel quickly. Good products give rich color and protect wood longer. Invest in trusted brands for better results. Cheap products often cause frustration and extra work.
Ignoring Safety Precautions
Staining involves chemicals that may harm health. Use gloves and masks to protect skin and lungs. Ensure good ventilation in the room. Keep products away from children and pets. Ignoring safety risks accidents and illness.

Credit: www.loudounvalleyfloors.com
Maintaining Restained Hardwood Floors
Maintaining restained hardwood floors keeps them looking fresh and beautiful. Proper care protects the wood and stain finish. A good routine helps your floors last longer and stay shiny.
Regular Cleaning Routine
Sweep or vacuum floors daily to remove dust and dirt. Use a soft broom or vacuum with a hardwood floor attachment. Mop floors weekly with a damp mop and a gentle cleaner made for wood. Avoid soaking floors with water. Dry floors quickly to prevent damage.
Preventing Scratches And Damage
Place felt pads under furniture legs to stop scratches. Use rugs or mats in high-traffic areas. Avoid walking on floors with high heels or shoes that may cause marks. Keep pets’ nails trimmed to reduce scratches. Clean spills immediately to prevent stains and damage.
When To Reapply Stain
Check floors for dull or faded spots regularly. If the color looks uneven, it may be time to reapply stain. Small scratches can often be touched up with stain markers. For large worn areas, sanding and restaining might be needed. Reapply stain every few years to keep floors vibrant.
Hiring Professionals Vs Diy
Deciding between hiring professionals or doing hardwood floor restaining yourself can be tough. Each choice has clear benefits and challenges. Understanding these can help you make the best decision for your home and budget.
Pros And Cons Of Diy
DIY restaining saves money on labor costs. You control the project timeline and methods. It can be satisfying to do the work yourself. Yet, mistakes can happen without experience. Uneven staining or damage to wood is common. The process takes time and effort. Tools and materials must be purchased or rented. Cleanup can be difficult and messy.
Benefits Of Professional Services
Professionals bring skill and experience to the job. They prepare floors thoroughly for best results. High-quality products and tools ensure lasting finish. Work is usually faster and cleaner than DIY. Pros can fix any damage or imperfections. They offer warranties or guarantees on work done. Peace of mind comes with expert handling. Professionals reduce risks of costly errors.
Cost Comparison
DIY costs include materials, tools, and your time. It is cheaper upfront but may lead to extra expenses. Professional services cost more initially. They include labor and expertise fees. Quality results reduce future repair costs. Consider long-term value over short-term savings. Budget for what fits your skills and needs best.

Credit: www.hgtv.com
Frequently Asked Questions
What Is The Best Way To Restain Hardwood Floors?
The best way to restain hardwood floors is to sand the surface first. Then, clean the dust and apply the stain evenly. Finish with a protective clear coat.
How Long Does Hardwood Floor Restaining Take?
Restaining hardwood floors usually takes two to three days. This includes sanding, staining, drying, and sealing time. Drying time depends on room temperature and humidity.
Can I Restain Hardwood Floors Myself?
Yes, you can restain hardwood floors yourself with the right tools. Sanding, staining, and sealing need patience and care. Small areas are easier for beginners.
How Often Should Hardwood Floors Be Restained?
Hardwood floors typically need restaining every 7 to 10 years. This depends on wear, sunlight, and foot traffic. Regular cleaning helps extend the finish life.
Conclusion
Restaining hardwood floors brings new life to tired surfaces. It refreshes color and hides scratches well. This process saves money compared to full replacement. Choose the right stain color for your space. Proper preparation ensures the best, long-lasting results. Regular care keeps floors looking fresh and clean.
A simple restain can change your room’s feel. Try it yourself or hire a professional. Enjoy the beauty of your hardwood floors again.