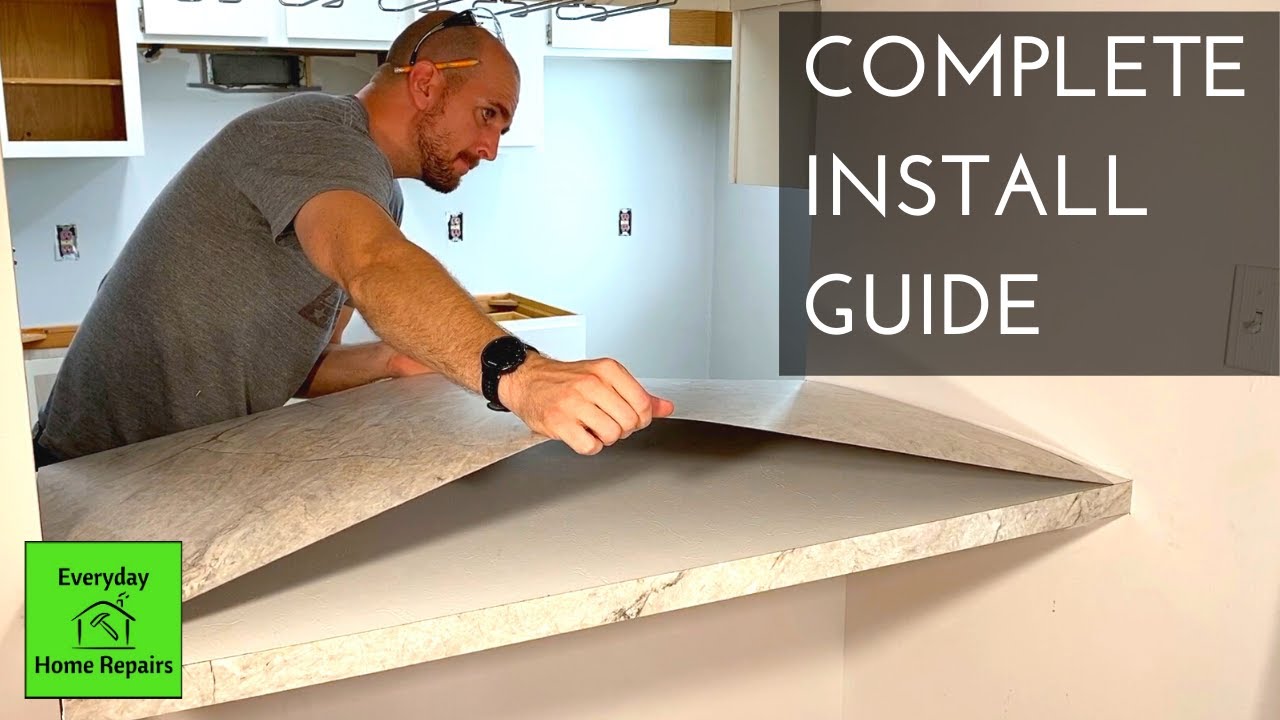
Are you ready to transform your kitchen without spending a fortune? DIY laminate countertops offer a stylish, affordable way to upgrade your space quickly.
Imagine having beautiful, durable surfaces that look professionally done—all created by your own hands. In this guide, you’ll discover simple steps, expert tips, and clever tricks to make your countertop project a success. Keep reading, and you’ll unlock the secrets to a stunning makeover that fits your budget and your schedule perfectly.
Benefits Of Laminate Countertops
Laminate countertops offer many benefits for those who want to update their kitchen. They provide a practical and stylish surface. These countertops combine beauty, strength, and affordability. They suit many home styles and budgets.
Many homeowners choose laminate for its easy installation and maintenance. It can handle daily kitchen tasks without much wear. The material resists stains and scratches well. Laminate countertops give a fresh look without high costs.
Cost-effectiveness
Laminate countertops are budget-friendly compared to stone or wood. They cost less to buy and install. This makes them a smart choice for home projects. You get a stylish surface without spending too much money. It’s perfect for those who want good value.
Variety Of Designs
Laminate comes in many colors and patterns. Some designs mimic wood, stone, or tile. This variety lets you match any kitchen style. You can find classic, modern, or bold looks easily. The options make it simple to personalize your space.
Durability And Maintenance
Laminate resists stains, heat, and scratches better than many think. It cleans easily with just soap and water. No special cleaners or treatments are needed. This surface stays looking good for years. It fits busy kitchens and active homes well.
Choosing The Right Laminate
Choosing the right laminate for your countertops is key to a successful DIY project. This choice affects how your kitchen looks and feels. It also impacts durability and maintenance. Knowing what options exist helps you pick the best one for your needs. Consider color, thickness, and style carefully. These factors guide you to a laminate that fits your kitchen perfectly.
Popular Colors And Patterns
Laminate countertops come in many colors and patterns. You can find solid colors, wood grains, stone looks, and more. Light colors make small kitchens look bigger. Dark colors add a modern touch. Patterns can mimic natural materials like granite or marble. Choose a color or pattern that fits your taste and kitchen vibe.
Thickness And Quality Options
Laminate comes in different thicknesses, usually from 0.5 mm to 1.5 mm. Thicker laminates feel stronger and last longer. Quality varies by brand and price. Higher quality laminates resist scratches and heat better. They also look more realistic. Balance your budget with quality to get the best value.
Matching Your Kitchen Style
Your laminate should match your kitchen’s style and decor. For a classic look, choose wood or marble patterns. For a modern kitchen, try solid colors or sleek designs. Consider your cabinets and flooring. The laminate should blend well and enhance the overall look. This creates a harmonious and inviting space.
Tools And Materials Needed
Before starting your DIY laminate countertop project, gather all necessary tools and materials. Having the right items ensures smooth work and better results. Prepare your workspace to keep everything organized and easy to reach.
Essential Tools List
- Measuring tape for accurate dimensions
- Electric jigsaw or circular saw for cutting laminate sheets
- Router with a laminate trimming bit for clean edges
- Screwdriver or drill for securing countertop parts
- Clamps to hold pieces firmly in place
- Sandpaper or sanding block to smooth edges
- Utility knife for trimming excess laminate
- Straight edge or ruler for precise cuts
- Putty knife for spreading adhesive evenly
Recommended Adhesives
Use high-quality contact cement designed for laminate surfaces. It bonds laminate firmly to the countertop base. Apply adhesive to both the laminate and the base. Let it dry until tacky before pressing together. Avoid cheap glues that may cause bubbling or peeling.
Safety Gear
Protect yourself while working with tools and adhesives. Wear safety goggles to shield your eyes from dust and debris. Use a dust mask to avoid inhaling particles. Gloves protect your hands from chemicals and sharp edges. Ear protection helps reduce noise from power tools.

Credit: www.instructables.com
Preparing Your Existing Countertops
Preparing your existing countertops is a key step before installing laminate. A clean, smooth surface helps the new laminate stick properly. Take time to fix any damage and get accurate measurements. This prep work saves problems later and gives a better finish.
Cleaning And Repairing Surfaces
Start by cleaning the countertop well. Use a mild soap and water to remove dirt and grease. Dry the surface completely before moving on. Check for cracks, chips, or holes. Fill small holes with wood filler and sand smooth. Large damage may need extra care or replacement parts. A flat surface ensures the laminate lies evenly.
Measuring And Marking
Measure your countertop carefully. Use a tape measure to get the length and width. Write down each number clearly. Mark the edges with a pencil for cutting guides. Double-check measurements to avoid mistakes. Accurate marking helps cut laminate panels to the right size. This step keeps the project neat and precise.
Removing Old Countertops
Removing old countertops might be necessary for some projects. Use tools like a pry bar or screwdriver for this task. Work slowly to avoid damaging cabinets or walls. Disconnect plumbing or appliances attached to the countertop first. Dispose of the old surface properly. A clean workspace makes installing laminate easier and safer.
Cutting And Fitting Laminate Sheets
Cutting and fitting laminate sheets is a key step in creating your DIY laminate countertops. Proper cutting ensures the sheets fit perfectly on your countertop base. Fitting the laminate carefully avoids gaps and uneven edges. Taking your time with this process leads to a smooth, professional finish that lasts.
Measuring For Accuracy
Start by measuring your countertop surface carefully. Use a tape measure to get the exact length and width. Double-check your numbers to avoid mistakes. Mark the measurements clearly on the back of the laminate sheet. Precise measurements prevent waste and save time.
Cutting Techniques
Use a sharp utility knife to cut the laminate sheet. Score the surface deeply along your marked lines. Snap the laminate along the scored line for a clean edge. For curves or irregular shapes, use a jigsaw with a fine blade. Cut slowly to avoid chipping the laminate surface.
Dry Fitting The Laminate
Place the cut laminate sheet onto the countertop base without glue. Check the fit around corners and edges carefully. Make small adjustments by trimming any excess material. Ensure the sheet lies flat with no bubbles or wrinkles. A perfect dry fit helps when you apply adhesive later.
Credit: www.youtube.com
Applying Adhesive And Installing
Applying adhesive and installing laminate countertops is a crucial step in your DIY project. This process ensures the countertop stays secure and looks great. Careful work helps avoid gaps, bubbles, or loose edges.
Follow the right methods to get a smooth and strong finish. The right adhesive and proper installation tools make a big difference. Let’s explore the best ways to apply adhesive and install your laminate countertop.
Choosing The Right Adhesive
Select adhesive designed specifically for laminate surfaces. Contact cement is a popular choice because it bonds quickly and strongly. Water-based adhesives are easier to clean but may take longer to set.
Check the manufacturer’s instructions for compatibility with your countertop material. Avoid general glues that do not support laminate well. A good adhesive prevents peeling and keeps the surface flat and smooth.
Step-by-step Application
Start with a clean, dry surface. Dust or grease can weaken the bond. Apply adhesive evenly on both the laminate and the countertop base.
Use a brush or roller for a thin, uniform layer. Allow the adhesive to dry until it feels tacky but not wet. This tacky stage is crucial for a strong bond.
Align the laminate carefully over the base. Avoid sliding it around once contact is made. Press down firmly to ensure full contact across the surface.
Securing And Clamping
Use clamps or heavy weights to hold the laminate in place. This prevents shifting while the adhesive dries. Place protective pads between clamps and laminate to avoid damage.
Keep pressure steady for the time recommended by the adhesive manufacturer. Remove clamps gently after drying. Check edges for any gaps and press down if needed.
Proper clamping ensures a durable, smooth countertop that lasts for years.
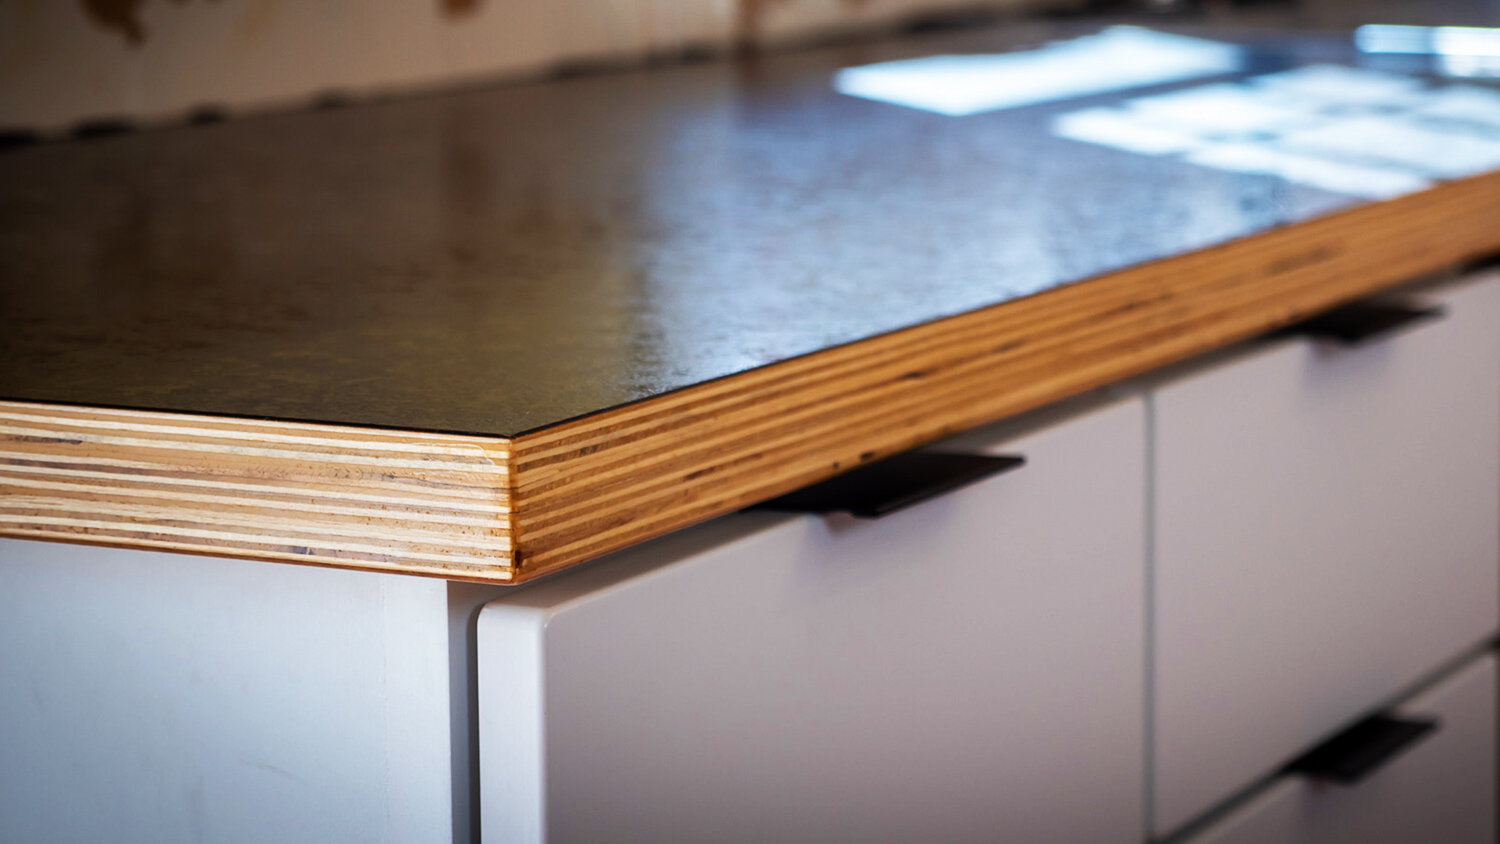
Trimming And Finishing Edges
Trimming and finishing edges is a crucial step in installing DIY laminate countertops. It gives your countertop a neat, professional look. Proper trimming ensures the edges fit perfectly without gaps or uneven spots. Finishing the edges protects the laminate from damage and moisture. This step requires attention and simple tools to get clean and smooth results.
Using Router And Trimming Tools
Use a router with a laminate trimming bit for smooth edges. Move the router along the edge evenly to avoid chips. Trimming tools like a utility knife help cut excess laminate carefully. Keep the blade sharp for clean cuts. Take your time to follow the countertop shape exactly. This creates a polished edge that fits perfectly.
Sealing Edges
Seal edges to protect the countertop from water and stains. Use a clear silicone sealant or laminate edge sealer. Apply a thin bead along the edge and smooth it with a finger or tool. Let the sealant dry completely before using the countertop. Sealing prevents moisture from damaging the laminate underneath.
Adding Edge Banding
Edge banding covers raw edges with a matching strip of laminate. Cut the banding to the right length. Use an iron or adhesive to stick it firmly. Press the banding down to avoid bubbles or gaps. Trim any extra with a sharp blade. Edge banding gives a seamless, finished look to your countertop edges.
Credit: craftedworkshop.com
Maintaining Laminate Countertops
Maintaining laminate countertops is simple and keeps them looking fresh. Regular care extends their life and keeps your kitchen tidy. These surfaces resist stains but still need gentle handling. Small efforts make a big difference in appearance and durability.
Cleaning Tips
Use a soft cloth or sponge for daily cleaning. Warm water mixed with mild soap works best. Avoid harsh chemicals that can damage the surface. Wipe spills quickly to prevent stains. Dry the countertop with a clean towel to avoid water spots.
Preventing Damage
Place hot pans on heat-resistant pads, not directly on laminate. Use cutting boards to avoid scratches from knives. Avoid dropping heavy objects on the surface. Keep sharp tools away to prevent dents. Clean up acidic spills like lemon juice right away.
Repairing Minor Scratches
Light scratches can be fixed with a colored repair paste. Match the paste to your countertop color for best results. Apply gently using a soft cloth and rub in small circles. Buff the area with a clean cloth after drying. For deeper scratches, consider professional repair kits.
Cost Comparison With Other Materials
Choosing the right countertop material affects both your budget and home style. Cost varies widely between options. Understanding the price differences helps with smart decisions. Below, compare laminate with popular materials like granite and quartz. See how each fits your budget and long-term needs.
Laminate Vs Granite
Laminate costs much less than granite. Typical laminate runs $10 to $40 per square foot. Granite often costs $40 to $100 or more. Granite needs professional installation. Laminate can be a DIY project. Granite is natural stone, which is heavy and requires extra support. Laminate is lighter and easier to handle.
Laminate Vs Quartz
Quartz is usually more expensive than laminate. Quartz prices range from $50 to $120 per square foot. Laminate offers many colors and styles at a fraction of the price. Quartz is durable and low-maintenance but costs more upfront. Laminate may scratch or chip easier but costs less to replace or repair.
Long-term Value
Granite and quartz last longer than laminate. They resist heat, scratches, and stains better. Laminate may need replacement in 10 to 20 years. Granite and quartz can last decades with care. Consider maintenance and durability when choosing. Balance upfront cost with how long the countertop will last.
Frequently Asked Questions
What Materials Are Needed For Diy Laminate Countertops?
You need laminate sheets, plywood or MDF boards, contact cement, a router, and clamps. Basic tools like a jigsaw and measuring tape are also essential.
How Long Does It Take To Install Laminate Countertops?
Installation usually takes one to two days, depending on your skill level. Drying time for glue and finishing steps affect the total time.
Can I Cut Laminate Countertops Myself Safely?
Yes, with the right tools like a jigsaw or circular saw, you can cut laminate safely. Always wear safety glasses and follow cutting guidelines for best results.
How Do I Maintain And Clean Laminate Countertops?
Use mild soap, warm water, and a soft cloth for daily cleaning. Avoid harsh chemicals and abrasive pads to prevent surface damage.
Final Words
DIY laminate countertops offer a budget-friendly way to refresh your kitchen. You can choose colors and patterns that fit your style. The process is simple and can save time. With basic tools, you can achieve a neat finish. This project boosts your home’s look without high costs.
Enjoy the satisfaction of creating something yourself. Start small, follow steps carefully, and see great results. Your kitchen will feel new and bright in no time.